
There’s nothing quite like the feeling of comfort you get from that perfect slice of nostalgia, right? Think fluffy white clouds piled high over a rich, creamy base—that’s the magic of a truly exceptional Coconut Cream Pie. Forget those flimsy fillings; we are going straight for that thick, luscious custard that made our grandparents swoon. Here at One Dish Universe, we honor recipes like this, mixing the wisdom passed down from my Nona in her Chicago kitchen with the precision I learned studying food science. As you can read on our About Page, we believe in simplicity without sacrificing flavor. We made sure this recipe keeps the creamy texture you crave but cuts down on the fuss, making celebratory eating easy, even when life gets hectic. This pie proves you don’t need a million dishes to create something totally unforgettable.
- Why This Traditional Coconut Cream Pie Recipe is Your New Favorite Spring Dessert
- Gathering Ingredients for Your Classic Coconut Cream Pie
- Expert Tips for the Best Coconut Custard Recipes
- Step-by-Step Instructions for a Traditional Coconut Cream Pie
- Tips for Success When Making Coconut Cream Pie
- Storage and Serving Suggestions for Your Coconut Cream Pie
- Frequently Asked Questions About Classic Cream Pies
- Understanding the Nutrition of This Retro Dessert
- Share Your Nona-Inspired Creations
Why This Traditional Coconut Cream Pie Recipe is Your New Favorite Spring Dessert
If you’re hunting for that perfect showstopper for Easter dinner or just a gorgeous way to welcome warmer weather, this pie fits the bill. This traditional coconut cream pie is designed around those nostalgic requests: a filling so thick you can stand a fork up in it, and a topping that actually holds its shape! Seriously, no more sad, soupy whipped cream here.
- It’s a wonderful choice for spring desserts because it’s rich but feels light and tropical.
- It honors Nona’s style—classic, satisfying, and utterly comforting.
- It uses simple steps so you spend less time worrying and more time planning the party!
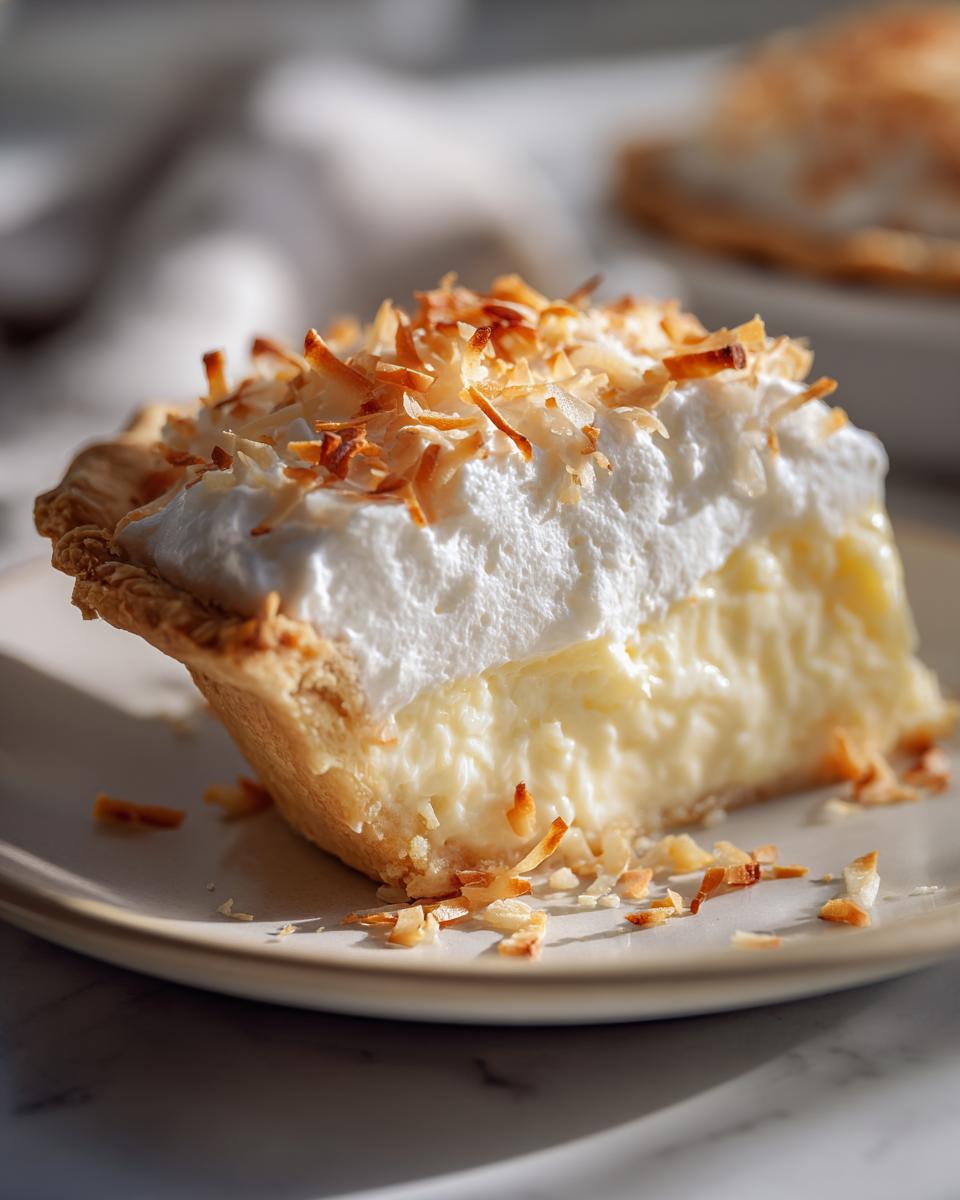
Achieving the Perfect Retro-Modern Aesthetic
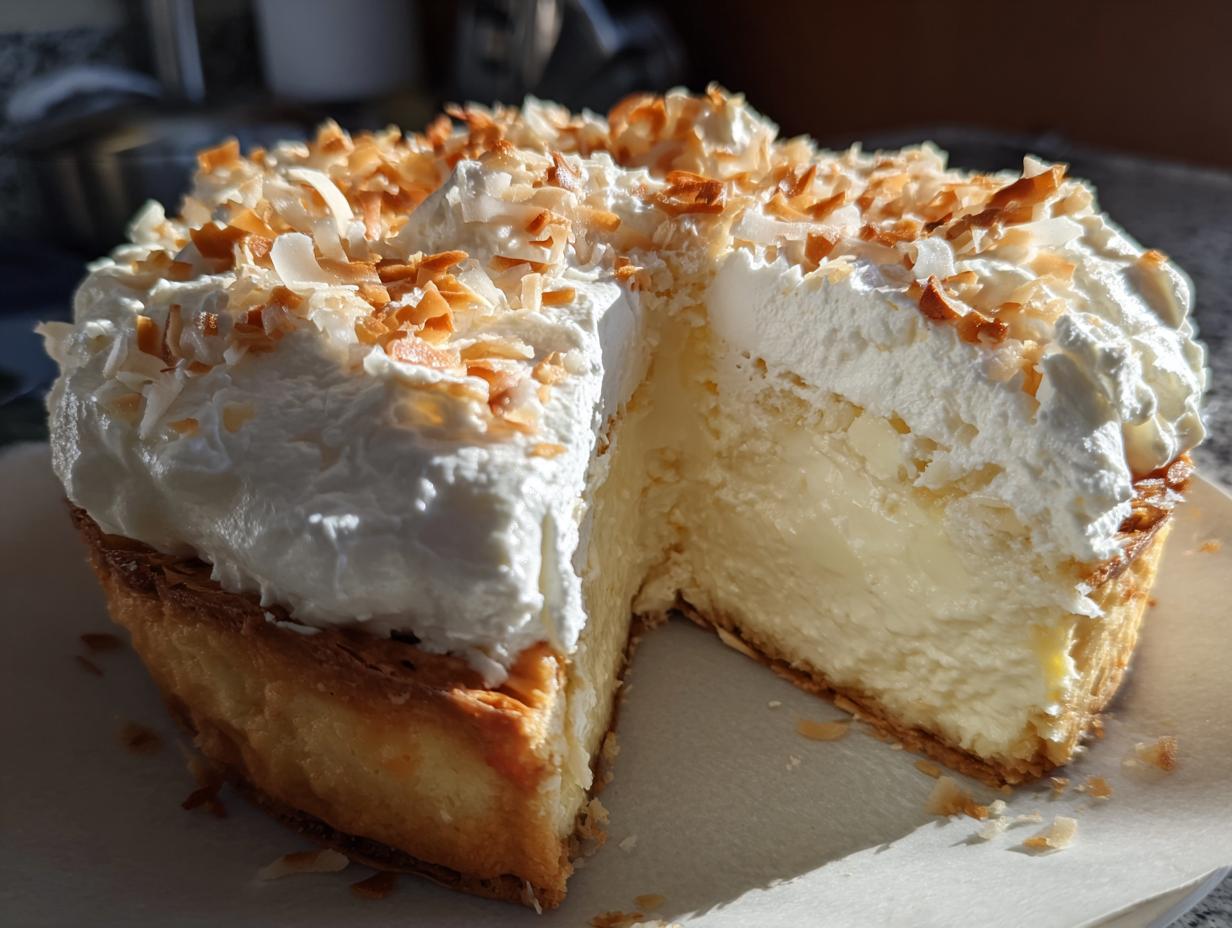
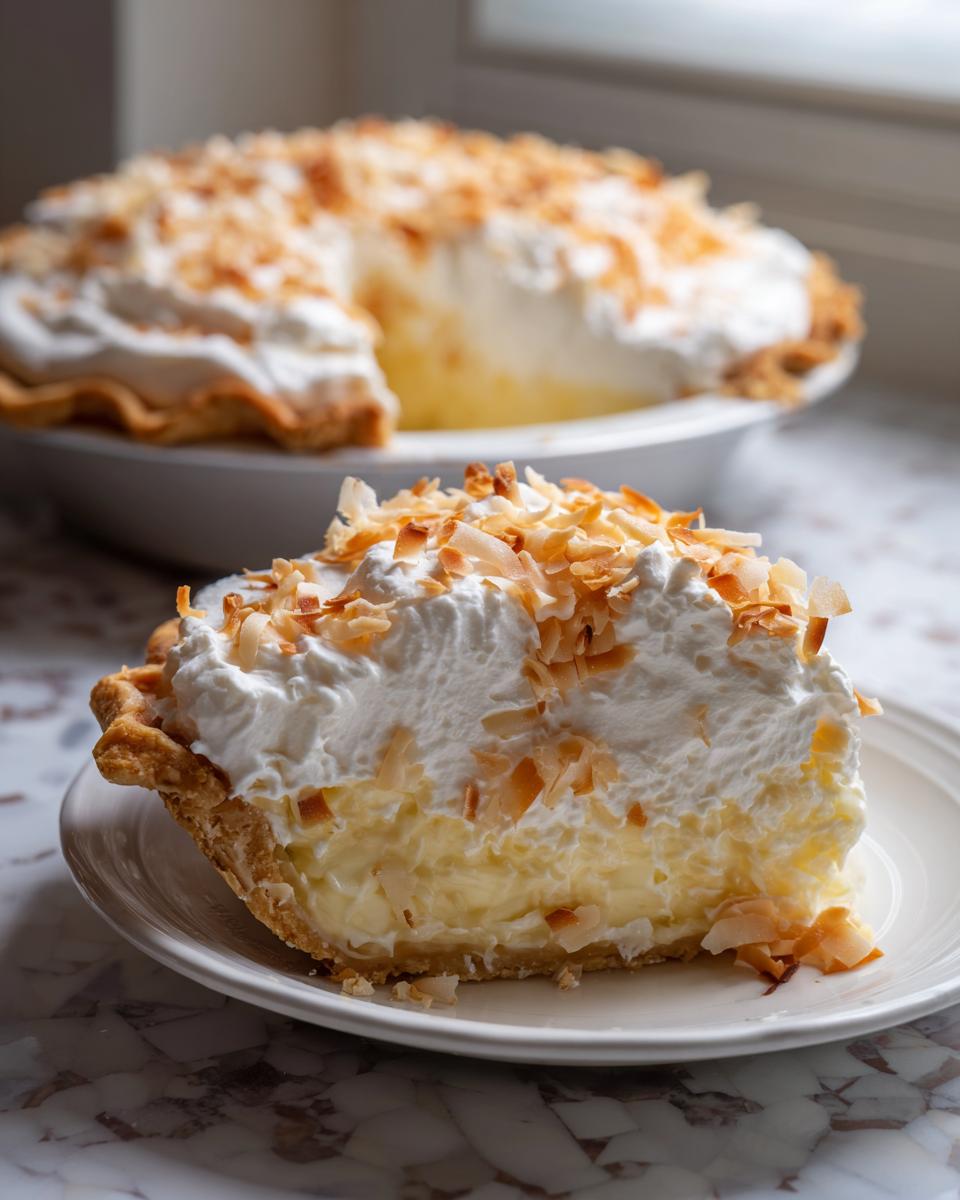
You want that gorgeous contrast, right? That bright white, perfectly piped whipped topping sitting against the pale yellow custard, studded with toasted coconut flakes? That look screams classic dessert done right. It’s retro, but because we use a rock-solid filling, it looks incredibly clean and modern on the table.
Gathering Ingredients for Your Classic Coconut Cream Pie
Okay, the beauty of this recipe is that it sticks so closely to the original ingredients Nona used. We aren’t buying fancy stabilizers here; we are relying on good old cornstarch and butter for that dreamy texture. Make sure you have your list ready! What you’ll need starts with one fully baked and cooled homemade pie crust—don’t skimp on the quality of that crust, it’s the base of everything!
For that thick, luscious coconut custard, gather your sugar, cornstarch, salt, milk, and those four important egg yolks. You’ll also need the vanilla, the butter, and crucially, the sweetened flaked coconut, which we need to divide into two portions.
Then for the topping, it’s just heavy cream, powdered sugar, and if you want that extra tropical punch, a little splash of coconut extract. Simple, right? Trust me, separating those ingredients before you start makes the stovetop cooking go way smoother.
Expert Tips for the Best Coconut Custard Recipes
When you’re aiming for those rich, velvety coconut custard recipes that taste exactly like you remember, technique matters more than measuring, almost. My biggest piece of advice for anyone attempting a stovetop filling is patience when dealing with those egg yolks. You absolutely MUST temper them! If you just dump the beaten yolks into the hot milk, you’ll end up with sweet scrambled eggs instead of smooth silk.
Take maybe half a cup of that hot milk mixture and very slowly whisk it into the yolks first, warming them up gently outside the pot. Then, and only then, you pour that mixture back into the saucepan while whisking constantly. This keeps everything perfectly blended.
Also, keep that heat medium-low! If you let it boil rapidly, the cornstarch won’t activate correctly, and you risk scorching the bottom of the milk, which instantly ruins the clean flavor of the custard.
Mastering the Homemade Pie Crust Foundation
Since we want this to be a quick, happy experience—remember, Nona hated fuss!—I usually buy a great quality store-bought crust, but it *has* to be fully blind-baked beforehand. If you decide to make your own fantastic homemade pie crust, make sure you give it a good, long bake until it’s deeply golden brown and completely cool before that hot custard goes in. A warm crust will absolutely disintegrate under the weight of this rich filling. Let it cool completely on a wire rack or counter—no shortcuts here!
Step-by-Step Instructions for a Traditional Coconut Cream Pie
Alright, deep breath. This is where we bring Nona’s wisdom to life! I know following complicated steps in a recipe can feel overwhelming, but I’ve broken this down so it’s just pure cooking. We start with the custard base—this is the heart of our traditional coconut cream pie—and then we move straight to chilling. Seriously, don’t rush that chill time!
Creating the Thick, Smooth Custard Filling
First things first, grab your saucepan. In that dry pot, we mix the sugar, cornstarch, and salt together. This dry whisking step is crucial because it prevents lumps before we even introduce liquid! Then, slowly stream in the whole milk while whisking constantly until everything looks perfectly smooth. Set the heat to medium, and now, pay attention: You need to stir this mixture without stopping. Don’t walk away! We are looking for it to thicken up enough so that when you pull your spoon out, the mixture coats the back of it; that usually takes about eight to ten minutes. Remember what I said about tempering? Once it’s thick, pull it off the heat, whisk a little hot milk into your four egg yolks, and then pour those warmed yolks back into the pot, stirring like crazy. Then, we return it to *low* heat for just one minute more—no boiling! Stir in that butter and vanilla until it melts, and finally fold in one full cup of that sweetened flaked coconut.
The Final Assembly of Your Coconut Cream Pie
Now you pour that beautiful, hot, creamy mixture right into your cooled, ready-to-go pie shell. This next trick is non-negotiable if you want a smooth top: Get a piece of plastic wrap and press it directly onto the surface of the custard. I mean *directly*—no air gaps allowed! This stops that ugly skin from forming while it chills. Then, tuck the whole thing into the fridge. You need a minimum of four hours, but honestly, overnight is even better to get that super firm base for your coconut cream pie.
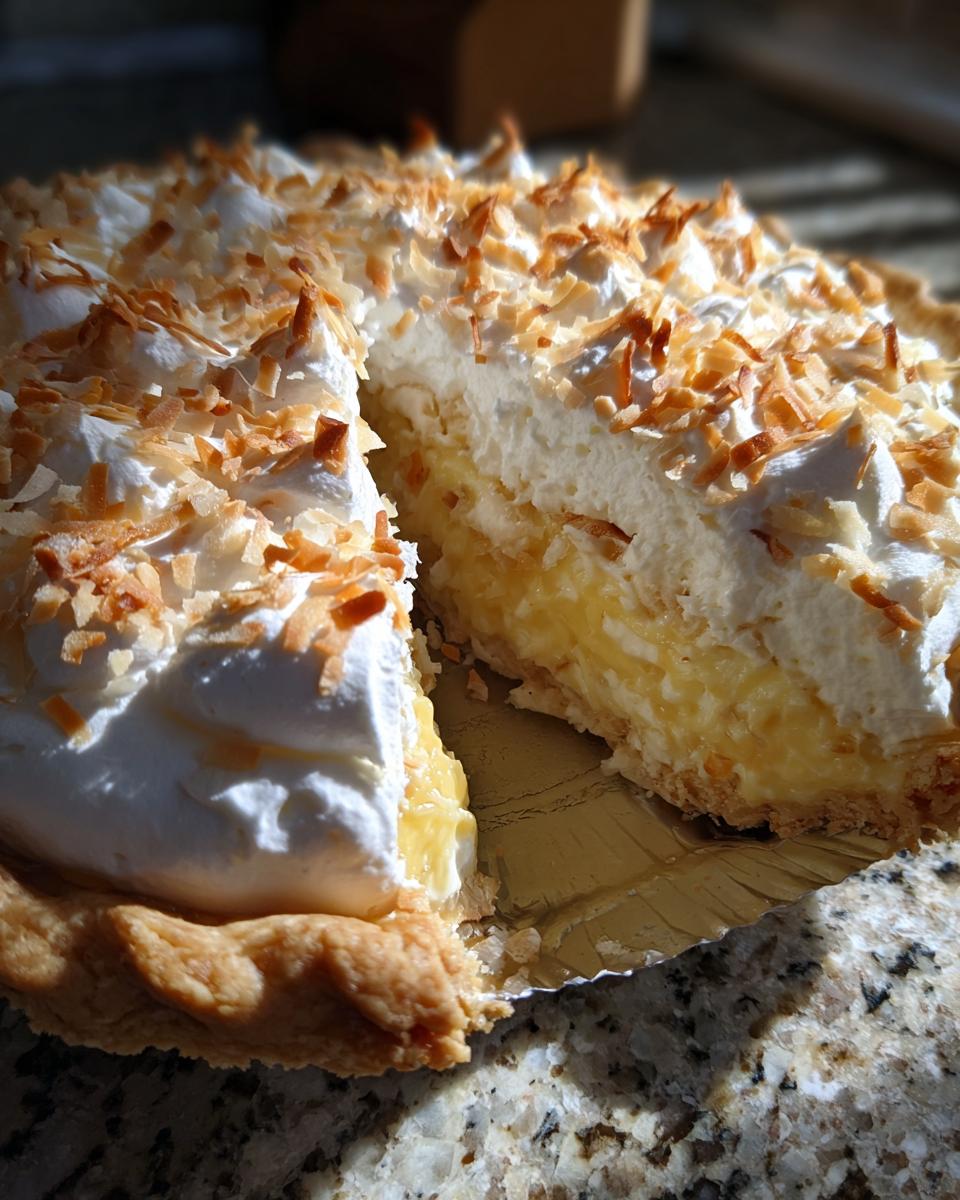
Once it’s chilled solid, we move on to the topping. Whip that heavy cream with the powdered sugar and optional coconut extract until you hit stiff peaks. This is the moment you see your hard work pay off! Spread that heavenly cloud over the firm custard, sprinkle the final half cup of coconut on top, and get it back in the cold until serving time. Perfection!
Tips for Success When Making Coconut Cream Pie
Nona always said that the difference between a good pie and a great pie is in those little extra steps—the ones you only learn after making a pie ten too many times! When it comes to that gorgeous whipped cream topping, keep it chilled! If you remember nothing else, remember to pop your mixing bowl and your whisk attachment into the freezer for about fifteen minutes before you start whipping. Cold tools mean the cream whips faster and holds its stiff peaks way longer.
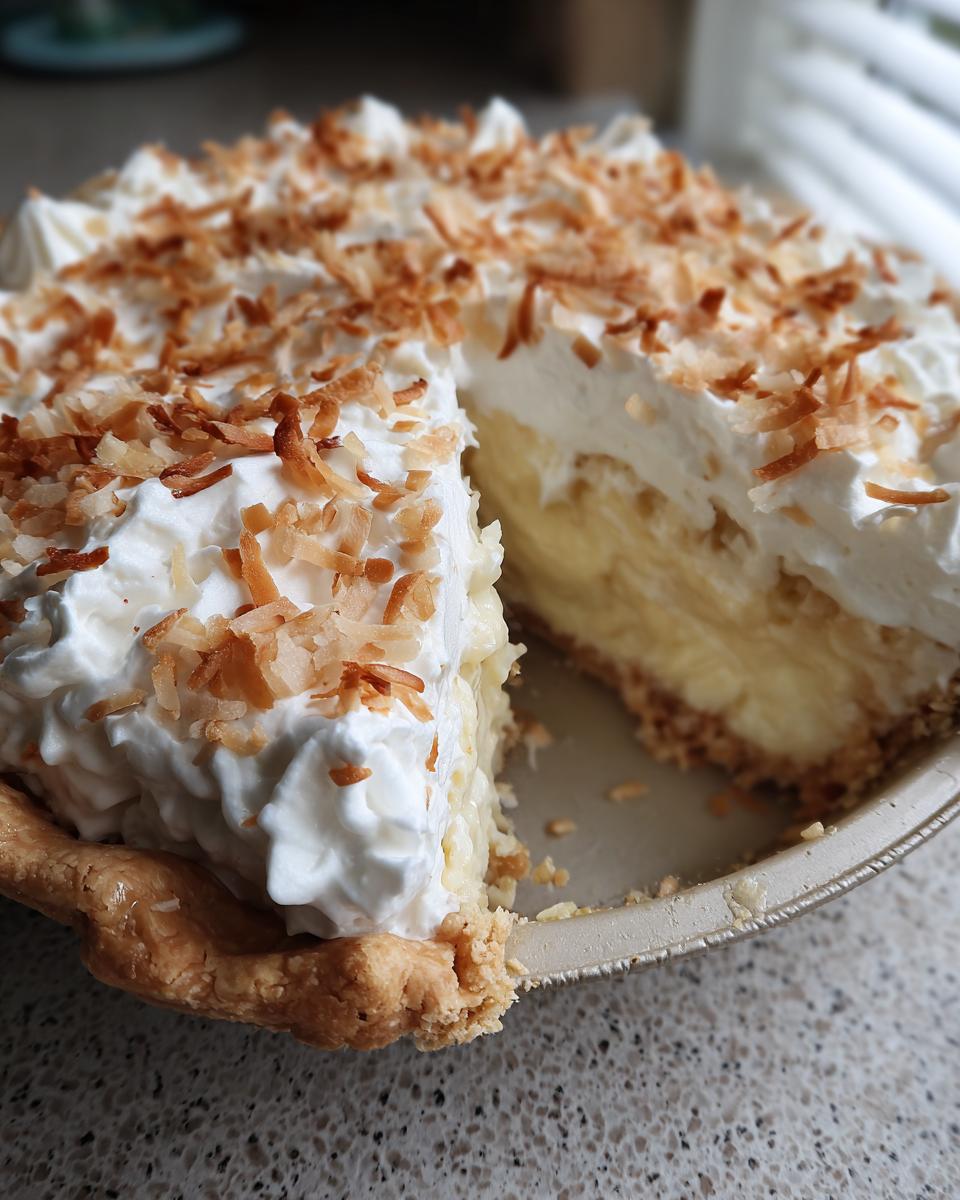
Another thing she loved, especially when preparing for company, was toasting that extra half cup of coconut. I just toss it into a dry skillet over medium heat and watch it carefully—seriously, it burns fast! Toasting it brings out this incredible nutty depth that plain coconut just doesn’t have. Trust me, sprinkling those golden flakes on top of your finished traditional coconut cream pie elevates the whole dessert!
Storage and Serving Suggestions for Your Coconut Cream Pie
So, you’ve made this masterpiece! Now, how do we keep your beautiful presentation intact? Since the topping is real, fresh whipped cream, this amazing coconut cream pie needs to stay covered and chilled in the refrigerator. It’s really best eaten within two days, mainly because the whipped cream starts to soften after that, even protected by the plastic wrap on the custard.
If you are making this ahead of time for a big event—and goodness knows I always plan ahead when I’m prepping for something like national pie day 2026, or honestly, just a busy weekend—bake the crust and make the custard filling completely one day ahead. Chill that covered custard overnight. The very best part? Whip your cream and assemble the whole pie no more than four or five hours before you plan to serve it. That keeps the coconut flakes crunchy and the topping fluffy.
When it comes to serving, keep it simple, just like Nona would have done. This pie is rich enough on its own, but a tiny cup of intensely strong black coffee or a simple, slightly floral black tea is the perfect accompaniment. It cuts right through the richness of the custard beautifully.
Frequently Asked Questions About Classic Cream Pies
I get so many questions about this recipe once people see how stable and perfect that filling is! That’s the scientist in me coming out, I guess, making sure everything sets just right. Here are the things I hear most often about ensuring your classic cream pie turns out perfectly every single time.
Can I make the custard filling ahead of time?
Yes, definitely! In fact, I encourage you to make the custard filling a day ahead of time. As I mentioned, chilling it overnight lets it firm up completely, which is necessary before we load it up with the fresh whipped cream. Just remember that crucial step: you absolutely must press plastic wrap directly onto the surface of the filling so it doesn’t dry out or form that dreaded skin. The crust will stay crisp if you don’t let it sit for more than 24 hours before topping it.
How do I prevent my whipped cream topping from weeping?
Weeping, or the cream separating, is the enemy of the perfect presentation! If you want that beautiful, stiff-peak cloud to last, your bowl and cream need to be ice cold—that’s why I pre-chill everything. If you are worried, especially if your kitchen is warm, you can add about a teaspoon of unflavored gelatin dissolved in 2 tablespoons of cold water to the heavy cream *before* you start whipping. You just need to let it bloom for 5 minutes, then heat it briefly until clear, and chill it back down before adding it to the cold cream. That gives you an incredibly stable topping that holds for hours.
Is this recipe suitable for a Mother’s Day brunch?
Oh, absolutely! This is the kind of elegant, crowd-pleasing dessert that feels special without requiring you to stress out on the day of the big brunch. Since you can make the filling the day before, all you have to do that morning is whip the cream and top the pie. It’s one of my go-to spring desserts because it looks so fresh and bright!
What if I want a stronger coconut flavor in the custard?
That’s a great tweak! If you want more depth in the custard itself—beyond the coconut flakes already mixed in—you can substitute half a cup of your whole milk with heavy cream, as noted in the recipe notes. But for pure coconut punch, try warming the milk slightly with about 1/4 cup of shredded coconut simmered for 10 minutes, then strain it *before* you use it in the recipe. That infuses the milk beautifully, giving you fantastic flavor in your final coconut custard recipes!
Understanding the Nutrition of This Retro Dessert
We all know this indulgent slice of heaven isn’t exactly a diet food, but knowing what you’re enjoying helps, right? Based on the ingredients used in Nona’s version, one slice of this rich coconut cream pie comes out to roughly 410 calories. It’s got about 35 grams of sugar, which is where a lot of that classic sweetness comes from. I always tell my clients that great food is about balance, and this beautiful, rich dessert certainly balances out a lighter weeknight meal. These are just estimates, of course, but it gives you a good baseline!
Share Your Nona-Inspired Creations
I truly put my heart into sharing Nona’s way of cooking with you all—making beautiful food without making a huge mess! Now it’s your turn. I absolutely love hearing how this traditional coconut cream pie turned out for your family gatherings. Did you toast the coconut perfectly? Did your whipping cream stay stiff and fluffy? Don’t keep those successes a secret!
Please take a moment to leave a star rating right below the recipe card so others know how much you loved it. If you have a picture of your finished pie—maybe one with that perfect contrast between the custard and the topping—tag us on social media! I check all our messages and comments, especially when they come through our Contact Page, and nothing makes me happier than seeing your kitchen success stories.
Your feedback isn’t just nice; it helps other busy people realize they can make these stunning classics too. Happy baking, everyone!
PrintNona’s Traditional Coconut Cream Pie

Make a classic, rich coconut custard pie with a stable whipped topping. This recipe honors tradition with simple steps for a satisfying dessert.
- Prep Time: 20 min
- Cook Time: 15 min
- Total Time: 35 min
- Yield: 8 servings 1x
- Category: Dessert
- Method: Stovetop/Chilling
- Cuisine: American
- Diet: Vegetarian
Ingredients
- 1 (9 inch) homemade pie crust, baked and cooled
- 1 cup granulated sugar
- 1/4 cup cornstarch
- 1/4 teaspoon salt
- 2 cups whole milk
- 4 large egg yolks, lightly beaten
- 1 teaspoon vanilla extract
- 2 tablespoons unsalted butter
- 1 1/2 cups sweetened flaked coconut, divided
- 1 1/2 cups heavy whipping cream
- 1/4 cup powdered sugar
- 1/2 teaspoon coconut extract (optional)
Instructions
- In a medium saucepan, whisk together the granulated sugar, cornstarch, and salt.
- Gradually whisk in the whole milk until smooth.
- Cook over medium heat, stirring constantly, until the mixture thickens enough to coat the back of a spoon, about 8 to 10 minutes. Do not let it boil rapidly.
- Remove the saucepan from the heat. In a small bowl, temper the egg yolks by whisking a small amount of the hot milk mixture into the yolks. Then, slowly pour the tempered yolks back into the saucepan, whisking constantly.
- Return the saucepan to low heat and cook for 1 minute more, stirring constantly. Do not boil.
- Remove from heat. Stir in the vanilla extract and butter until the butter melts completely.
- Stir in 1 cup of the sweetened flaked coconut.
- Pour the hot custard into the cooled, baked pie crust. Press plastic wrap directly onto the surface of the custard to prevent a skin from forming. Chill for at least 4 hours, or until completely firm.
- When ready to serve, prepare the topping: In a chilled bowl, beat the heavy whipping cream until soft peaks form. Gradually add the powdered sugar and coconut extract, if using, beating until stiff peaks form.
- Spread or pipe the whipped cream over the chilled custard filling. Sprinkle the remaining 1/2 cup of flaked coconut over the whipped cream.
- Chill the finished coconut cream pie until serving.
Notes
- For a more stable whipped cream topping, chill your mixing bowl and whisk attachment for 15 minutes before whipping the cream.
- Toasting the reserved coconut flakes lightly in a dry skillet before sprinkling them on top adds depth of flavor.
- If you want a richer custard, substitute 1/2 cup of the whole milk with heavy cream.
Nutrition
- Serving Size: 1 slice
- Calories: 410
- Sugar: 35g
- Sodium: 210mg
- Fat: 22g
- Saturated Fat: 14g
- Unsaturated Fat: 8g
- Trans Fat: 0.5g
- Carbohydrates: 50g
- Fiber: 2g
- Protein: 6g
- Cholesterol: 110mg