
You know those evenings when you want something utterly decadent, something that screams ‘special occasion,’ but you absolutely do not want to spend half your evening scrubbing pots? I totally get it. That’s why this Chocolate lava cake recipe is my absolute go-to for nights like Mother’s Day eve or just when you need a quick dose of magic. Elena Valdez, who founded this whole universe based on her Nona’s wisdom, is obsessed with making sure you get big flavor without the big mess. Forget complicated pastry work; this fail-proof dessert balances pure indulgence with simplicity. We’re talking less than 15 minutes in the oven for that incredible, gooey payoff. Check out our story on why we love one-dish wonders—it explains everything! Trust me, achieving that perfect liquid center cake is easier than you think, and the look on someone’s face when they cut into it? Priceless.
- Why This Chocolate Lava Cake Recipe Delivers Pure Indulgence
- Essential Ingredients for Your Chocolate Lava Cake
- Expert Tips for Making the Best Chocolate Lava Cake
- Step-by-Step Instructions for Perfect Chocolate Lava Cake
- Serving Suggestions for Your Chocolate Lava Cake
- Storage and Reheating Instructions for Individual Chocolate Desserts
- Frequently Asked Questions About Chocolate Lava Cake
- Estimated Nutritional Data for This Chocolate Lava Cake
- Share Your Chocolate Lava Cake Success
Why This Chocolate Lava Cake Recipe Delivers Pure Indulgence
When you need a celebratory dessert fast, this recipe is the answer! It gives you that high-end restaurant feel using basic pantry items. It’s all about low effort and maximum reward, making it perfect for a quiet, special evening for two.
Here’s exactly why this method beats store-bought:
- It’s genuinely quick—we’re talking about serving dessert before you finish cleaning the whisk.
- The result feels incredibly luxurious, like a real treat you earned.
- It’s portion-controlled, so you don’t end up with half a cake staring at you tomorrow!
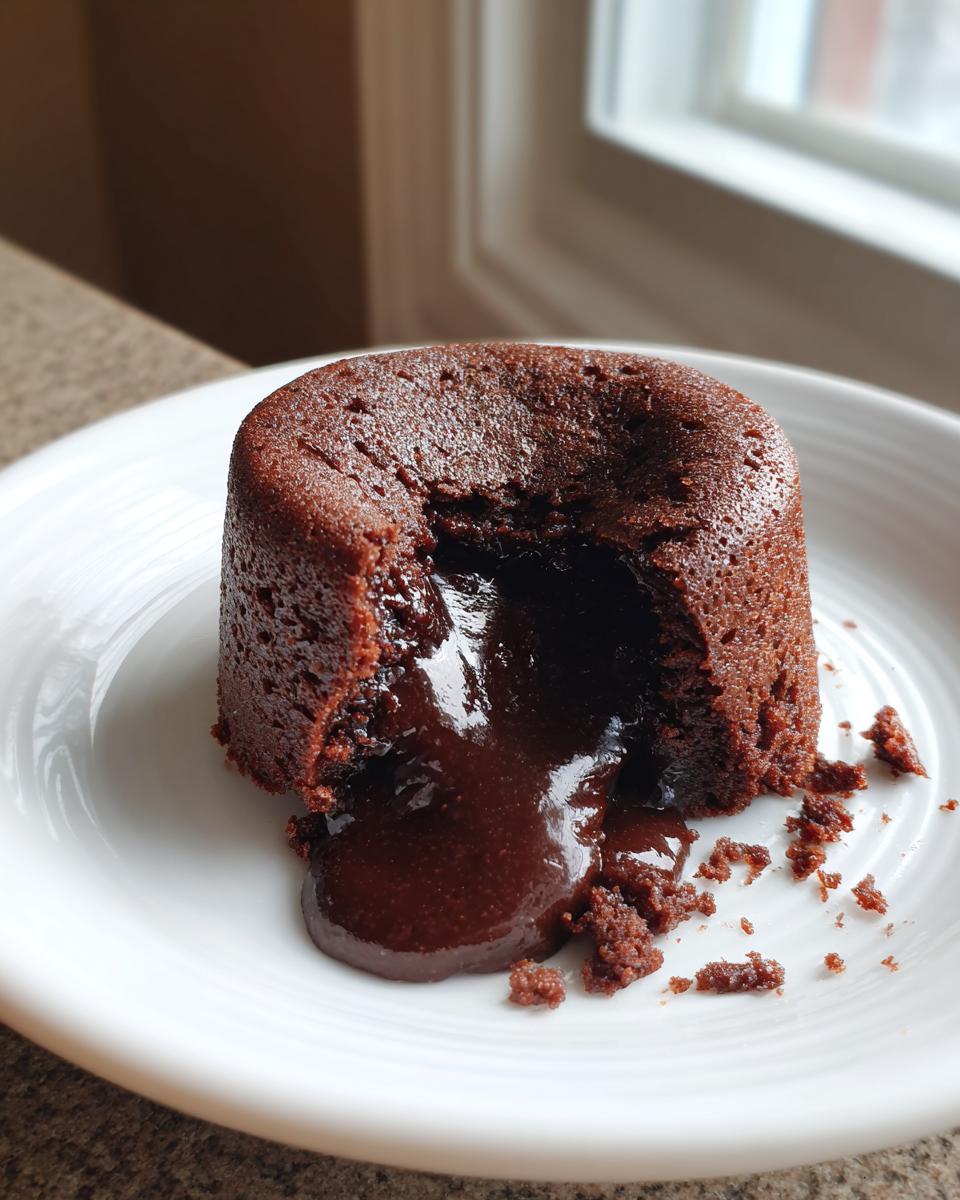
Achieving the Perfect Molten Lava Cake Center
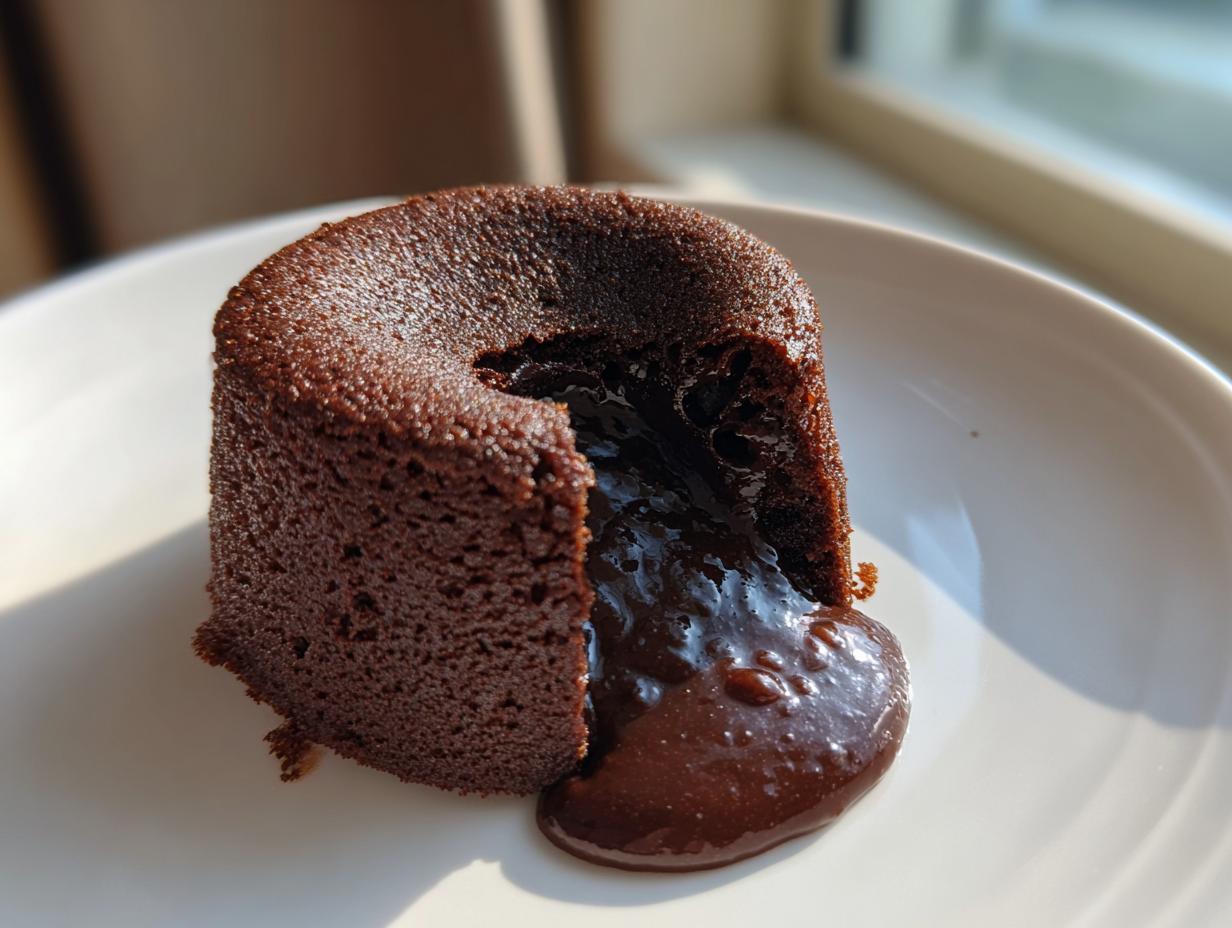
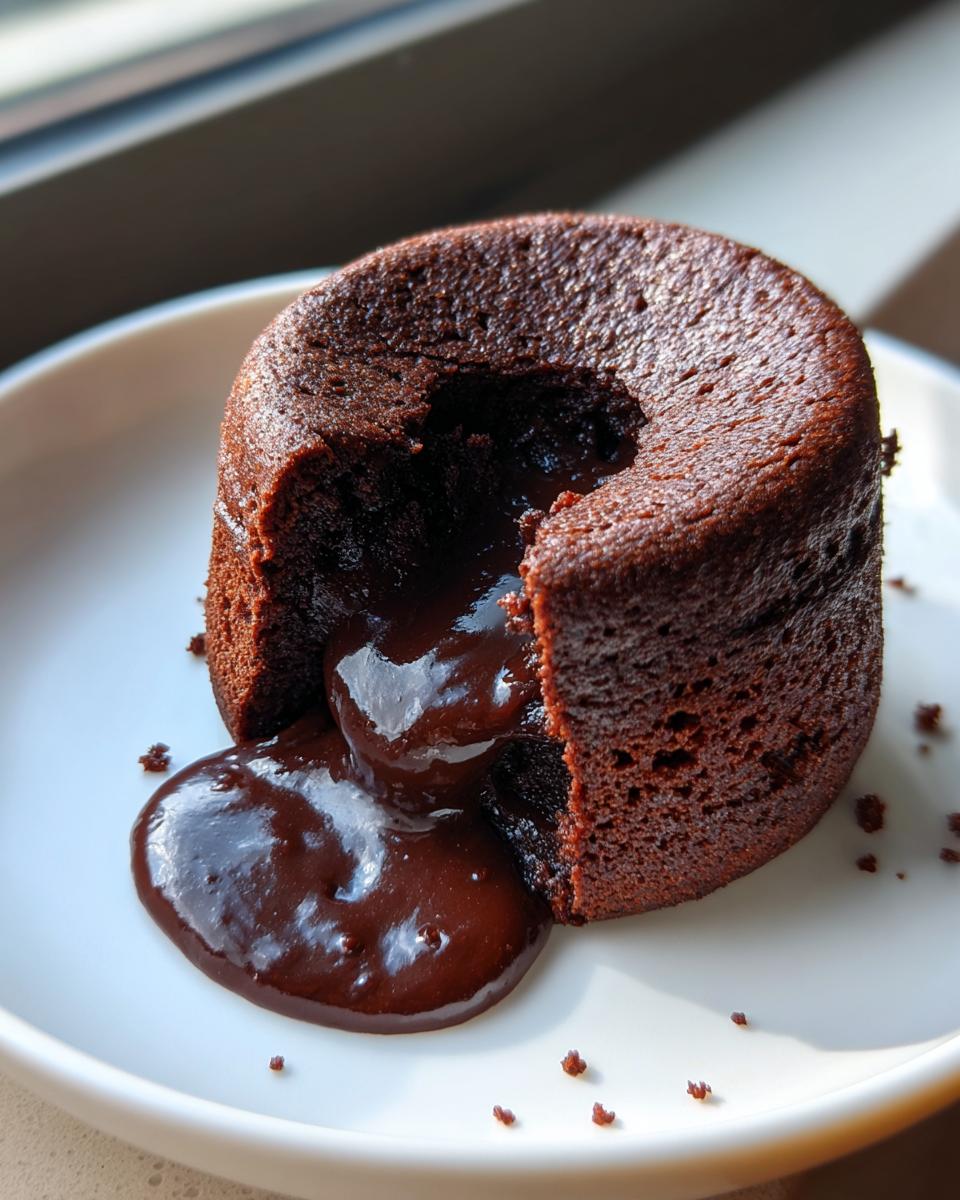
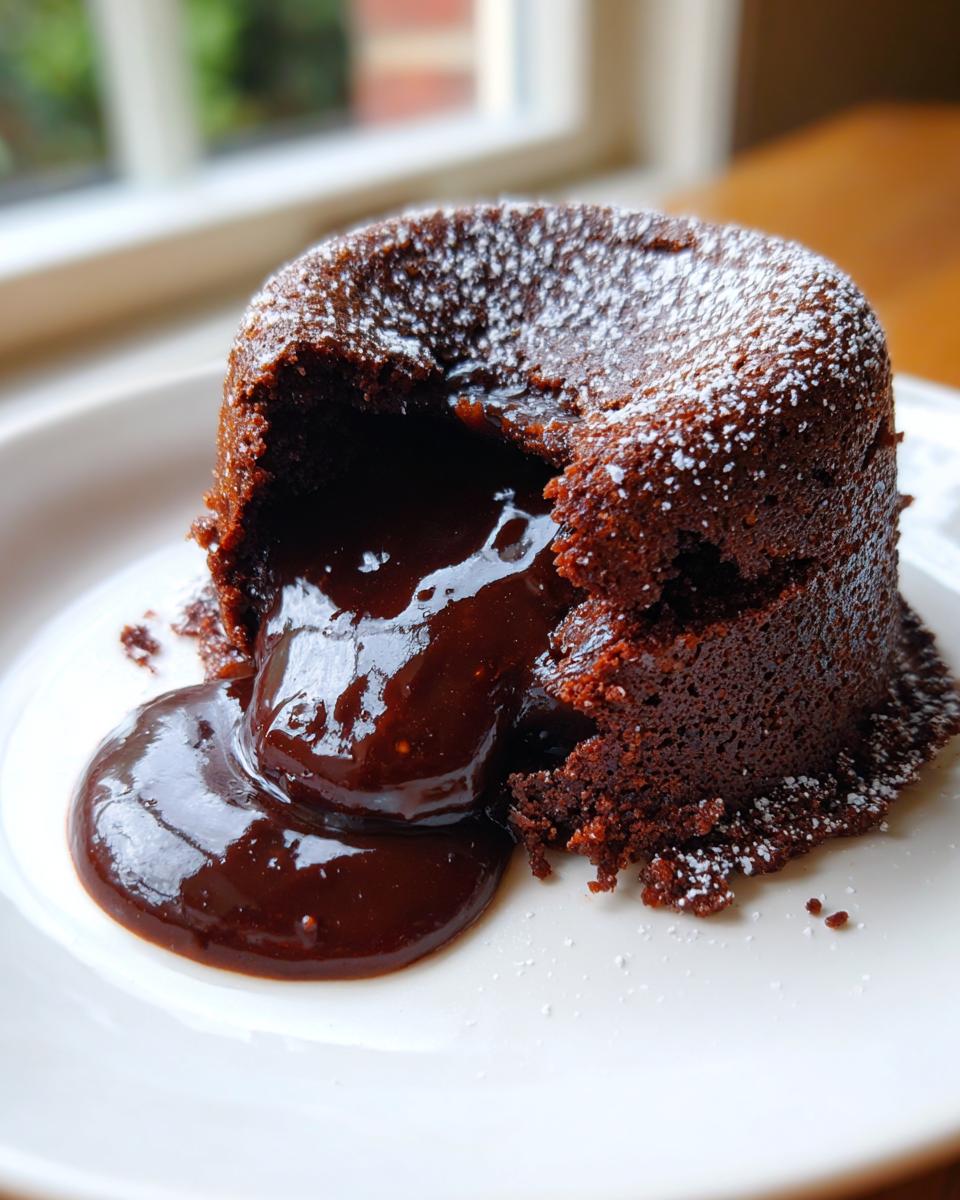
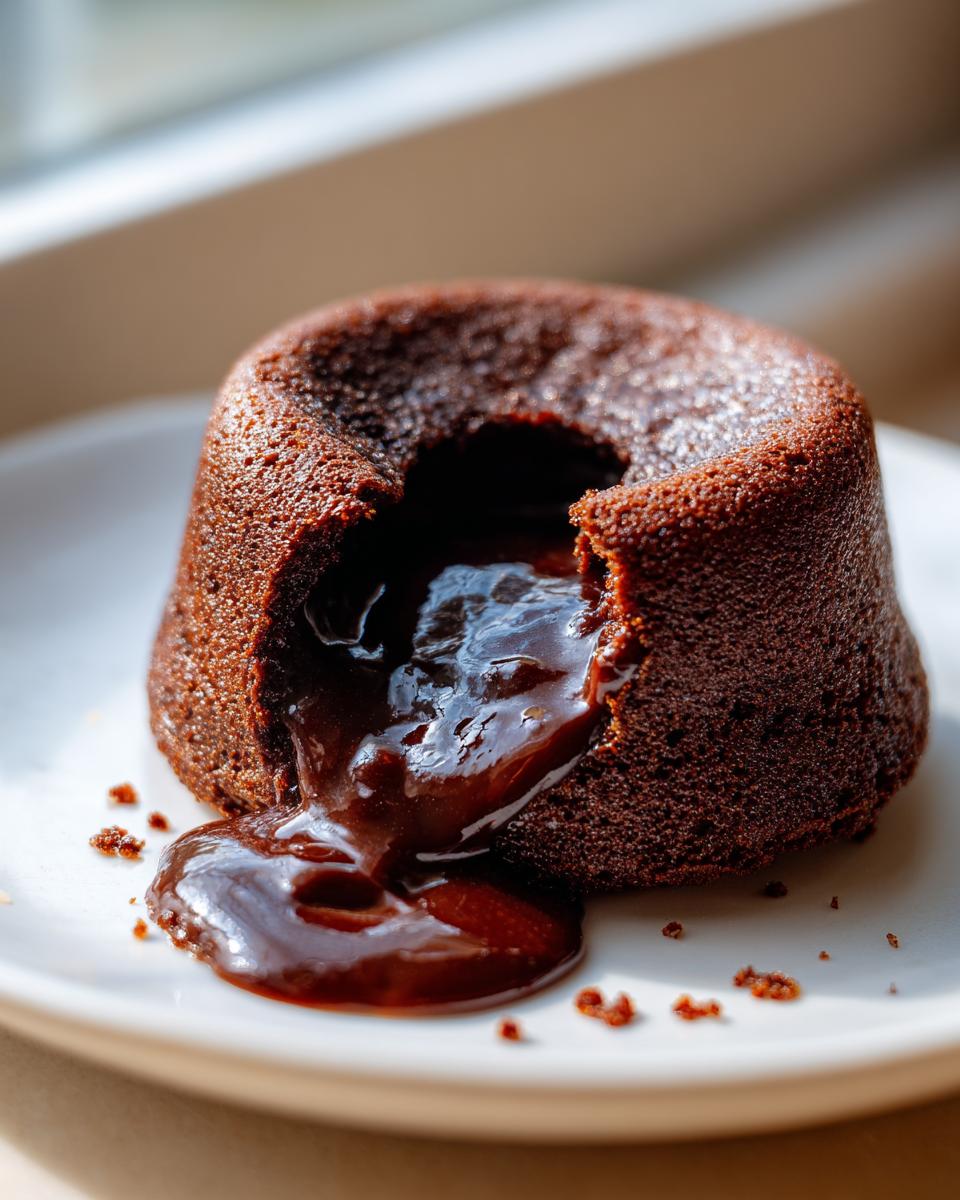
This is the secret handshake moment, so listen up! We are aiming for the sweet spot between a soufflé and actual batter. You’ll bake these for just 12 to 14 minutes at a very high heat. When you look in the oven, the edges must look firm, but the center absolutely needs to retain a slight wobble. Don’t poke it! That gentle jiggle is your guarantee of a beautiful, runny, liquid center cake waiting inside.
Quick Preparation for Individual Chocolate Desserts
It takes me about 10 minutes flat to get this batter mixed up, start to finish. That speed is intentional! Since this recipe yields just two perfect servings, it’s fantastic for date night or that little Mother’s Day treat. You aren’t mixing a huge batch; you’re creating two perfectly portioned, rich chocolate treats in minutes.
Essential Ingredients for Your Chocolate Lava Cake
Okay, this recipe is built on simplicity, so you need to make sure the ingredients you *do* use are top-notch. Since there are so few components, quality really shines through here. Don’t even think about skipping the cocoa powder for dusting—that helps the cake release cleanly! You only need a few things, but every single one needs to be measured carefully because we aren’t relying on tons of flour to bulk this up.
Here is what you need for your two perfect servings:
- 4 ounces bittersweet chocolate, chopped (seriously, get the good stuff!)
- 4 tablespoons unsalted butter
- 1 large egg
- 1 large egg yolk (yes, just the yolk in addition to the whole egg!)
- 2 tablespoons granulated sugar
- 1 teaspoon all-purpose flour
- Pinch of salt
- Unsweetened cocoa powder, for dusting ramekins
Expert Tips for Making the Best Chocolate Lava Cake
When you’re aiming for that perfect eruption of chocolate, the little details Nona always stressed behind the scenes truly matter. My experience consulting with busy clients showed me that the failure point usually isn’t the mixing; it’s the prep work or the chocolate choice itself. Take your time melting the chocolate and butter—patience here prevents scorching, which tastes bitter later. And listen, take that extra minute to really grease and dust those ramekins. I promise you, one cake sticking ruins the whole romantic moment!
If you skip the cocoa dusting and go straight to buttering, your beautiful individual chocolate desserts will fight you when you try to flip them out. We want a clean release so that molten center stays exactly where it should be.
Ingredient Notes and Substitutions for Your Liquid Center Cake
For the best flavor possible, aim for 60% to 72% cacao in your bittersweet chocolate. That higher cocoa content gives you that deep, rich, slightly bitter contrast to the sugar. If you only have semi-sweet chips on hand, go ahead and use them! It will work, but honestly, the flavor won’t be as intensely decadent. Just know that if you use milk chocolate, you might need to drop your baking time down by a minute because it melts faster.
Step-by-Step Instructions for Perfect Chocolate Lava Cake
Alright, let’s get cooking! This process moves quickly once you start, so make sure your oven is hot. Our first official step is that preheat. We are blasting these at 425 degrees Fahrenheit—that high heat is crucial for setting the outside before the inside completely cooks. While that’s heating up, you’ll tackle the ramekins, which is the most important insurance policy for getting those beautiful individual chocolate desserts onto their plates.
Next, you’ll slowly melt your chocolate and butter, stirring until it’s smooth as silk. Then, whisk your eggs and sugar until they get pale—this incorporates the air you need. Finally, combine everything gently; remember, we are done when we see no more white streaks of flour. Once the batter is divided, pop them in the oven for that magic window. After the oven, you must let them rest for exactly 1 minute. Any less, and they collapse; any more, and you lose that liquid center! Then, invert carefully onto your plate. That’s it!
Preparing the Ramekins for Easy Release
Don’t skip this, seriously! You need to generously butter the entire inside of your two 6-ounce ramekins. Once buttered, grab your unsweetened cocoa powder and dust the insides. Rotate the ramekin until every single surface is covered, then tap out any extra powder that falls off. This non-stick cocoa coating guarantees your molten lava cake is going to slide right out onto the plate when you flip it over later.
Baking Time for the Ideal Quick Chocolate Treats
The difference between a lava cake and a regular cupcake is about 60 seconds in the oven, so pay attention here! Bake for 12 to 14 minutes. You are looking for visual cues only: the edges must look completely set and firm, but when you gently nudge the pan, the very center should still shimmy and jiggle softly like Jell-O. Do not open the oven door until at least the 12-minute mark—that rush of cool air can deflate your perfect bake!
Serving Suggestions for Your Chocolate Lava Cake
The moment of truth! Serving is what elevates this from a quick treat to a centerpiece for your special evening. Once you’ve successfully inverted that beautiful cake, make it look stunning. My favorite way is to dust it lightly with powdered sugar—it just looks so elegant against the dark chocolate. If you’re celebrating something big, like Mother’s Day, pile a few fresh raspberries or maybe a scoop of vanilla bean ice cream right next to it. That pop of color and the creamy coldness against the warm chocolate is just heavenly!
Storage and Reheating Instructions for Individual Chocolate Desserts
I know things get busy, so you’ll be thrilled to know these little delights are fantastic for making ahead! You can fill the ramekins with batter and pop them right into the fridge for up to 24 hours. That’s a lifesaver for planning a special evening!
Here’s the catch, though: if you bake them straight from the cold fridge, you absolutely must add 2 or 3 extra minutes to your baking time. That extra time ensures the heat penetrates that chilled center layer. While immediate serving is best for that flowing liquid center, knowing you can prep them early makes these quick chocolate treats so much less stressful!
Frequently Asked Questions About Chocolate Lava Cake
It happens! Whenever you’re aiming for that perfect dessert, especially when timing is tight for a special night, questions pop up. Don’t worry if this is your first time trying to master the molten lava cake. I’ve gathered the most common concerns I hear from people trying to make these perfect **individual chocolate desserts** for occasions like **Valentines Day baking**.
Can I make this Molten Lava Cake recipe in a different size pan?
You absolutely can try, but here’s the warning: if you use one large dish instead of two individual ramekins, you won’t get lava! The high heat needs that small surface area to set the edges quickly. A bigger pan means the whole thing bakes through evenly, and you just end up with a lovely, dense chocolate cake, not the molten center you’re hoping for.
What if my Chocolate Lava Cake center is completely liquid?
A little lava is what we want, but if it’s pouring out like soup, it probably needed another minute in that hot oven. Take a deep breath! If you catch it right when you flip it out, quickly slide it back onto the baking sheet and put it back in for just 60 to 90 seconds more. Watch it super closely so the edges don’t dry out completely! If you run into any trouble at all, feel free to reach out via our contact page.
How do I make sure I don’t overbake them?
My biggest piece of advice for avoiding a fully cooked cake is to trust your eyes over the timer sometimes. Preheat that oven properly, and when you hit that 12-minute mark, open the door and nudge the pan gently. If the center moves like thick pudding, you’re done. If it barely moves at all, give it two more minutes and check again. That jiggly center is everything for a decadent treat!
Is this recipe too complex for a Tuesday night?
Not at all! That’s the beauty of Elena’s philosophy—flavor without friction. With just 10 minutes of prep and a quick bake time, this is one of the fastest, most impressive **quick chocolate treats** you can make. It feels fancy but requires zero complex techniques. It’s perfect for impressing someone without stressing yourself out!
Estimated Nutritional Data for This Chocolate Lava Cake
You know, when you’re making something this rich, you aren’t really worried about the macros, right? But for those who like to keep track, here’s what you can generally expect from one of these beauties. Please remember, because we are using high-quality bittersweet chocolate and real butter, these numbers are just estimates based on standard ingredient measurements.
Each individual chocolate dessert comes in around 450 calories, with about 30 grams of fat and 40 grams of carbohydrates. It’s definitely a treat, but wow, is it worth every single bite!
Share Your Chocolate Lava Cake Success
Now that you’ve created your own little slice of chocolate heaven, I genuinely want to hear all about it! Did you achieve that perfect, gooey, liquid center cake on your first try? Was it for a birthday, or maybe just a quiet evening treat? Don’t be shy!
Please take a moment to leave a rating below and tell me what you thought. Did you serve it with raspberries or dust it with a little powdered sugar? Knowing how you adapted this recipe for your special evening helps the whole community! And if you snapped a photo of that glorious chocolate eruption, share it over on social media and tag us. We absolutely love seeing these **individual chocolate desserts** come to life in your kitchens. We put a lot of work into making sure these recipes offer simplicity and amazing results, so your feedback really means the world to Elena and the whole One Dish Universe family. Your experience helps us keep our promise of delicious, fuss-free meals!
PrintFail-Proof Chocolate Lava Cake for a Special Evening
Make this individual chocolate dessert with a liquid center for a quick, rewarding treat.
- Prep Time: 10 min
- Cook Time: 14 min
- Total Time: 24 min
- Yield: 2 servings 1x
- Category: Dessert
- Method: Baking
- Cuisine: American
- Diet: Vegetarian
Ingredients
- 4 ounces bittersweet chocolate, chopped
- 4 tablespoons unsalted butter
- 1 large egg
- 1 large egg yolk
- 2 tablespoons granulated sugar
- 1 teaspoon all-purpose flour
- Pinch of salt
- Unsweetened cocoa powder, for dusting ramekins
Instructions
- Preheat your oven to 425 degrees Fahrenheit. Butter two 6-ounce ramekins. Dust the inside of the buttered ramekins with cocoa powder, tapping out the excess.
- Place the chopped chocolate and butter in a microwave-safe bowl. Microwave in 30-second intervals, stirring between each, until completely melted and smooth. Set aside to cool slightly.
- In a separate small bowl, whisk together the whole egg, egg yolk, and granulated sugar until the mixture is pale and slightly thickened, about 1 minute.
- Gently whisk the melted chocolate mixture into the egg mixture until just combined.
- Whisk in the flour and salt until no streaks of flour remain. Do not overmix.
- Divide the batter evenly between the two prepared ramekins.
- Place the ramekins on a small baking sheet. Bake for 12 to 14 minutes. The edges should look set, but the center should still look soft and jiggly. This is key for your molten lava cake.
- Let the cakes cool in the ramekins for 1 minute. Run a thin knife around the edge of each cake.
- Carefully invert each cake onto a small serving plate. Serve immediately for the best liquid center experience.
Notes
- For a richer flavor, use high-quality bittersweet chocolate.
- Dust the finished cake with powdered sugar or serve with fresh raspberries for a beautiful presentation.
- If you are making these ahead, you can refrigerate the filled ramekins for up to 24 hours. Add 2-3 minutes to the baking time if baking from cold.
Nutrition
- Serving Size: 1 cake
- Calories: 450
- Sugar: 25
- Sodium: 150
- Fat: 30
- Saturated Fat: 18
- Unsaturated Fat: 12
- Trans Fat: 0
- Carbohydrates: 40
- Fiber: 3
- Protein: 8
- Cholesterol: 180