
Oh, I am so thrilled you’re here looking for this! Lately, I’ve noticed everyone talking about bringing back those incredible, comforting flavors from the 80s—that ‘New Nostalgia’ everyone is buzzing about for 2026. And what’s more iconic than a dish that requires a little bit of technique but rewards you tenfold? We’re talking about the legendary Chicken Kiev recipe, of course!
When I was working with busy clients before founding One Dish Universe, they always asked for restaurant-quality meals they could actually manage after work. This dish is my answer to that challenge. The true magic, the absolute goal here, is achieving that impossibly crispy, shatteringly golden exterior that hides a perfectly molten, herbed garlic butter center. Trust me, getting that butter to flow out just right when you slice into it isn’t luck; it’s technique. Nona always said that a great meal should feel like a celebration, and this classic European recipe certainly fits the bill without making you stress about the cleanup later.
- Why This Classic Chicken Kiev Recipe Delivers Restaurant Quality
- Ingredients for the Perfect Chicken Kiev Recipe
- Mastering the Herb Butter Filling for Your Chicken Kiev Recipe
- The Crucial Sealing Technique for Your Breaded Chicken Breast
- Achieving the Crispiest Fried Chicken Kiev Recipe Coating
- Frying Instructions for the Ultimate Chicken Kiev Recipe
- Serving Suggestions for Your Retro Dinner Ideas
- Storage and Reheating Instructions for Leftover Chicken Kiev
- Frequently Asked Questions About This Chicken Kiev Recipe
Why This Classic Chicken Kiev Recipe Delivers Restaurant Quality
The reason this Chicken Kiev recipe stands apart from all the quick fix versions out there is simple: we respect the process. Achieving that core, molten herb butter release requires precision. If the butter isn’t completely frozen, it just melts into the chicken, and suddenly you have a soggy mess instead of that glorious, dramatic flow. That’s why these retro dinner ideas work so well—they demand respect for the foundational steps!
We aren’t cutting corners on the pounding or the sealing because those details control the entire experience. You are aiming for the ultimate contrast: a shatteringly crisp exterior—your perfect crispy fried chicken kiev—and that steamy, fragrant center. When you nail the technique, it feels like you’ve unlocked a fine-dining secret right there in your kitchen. It’s well worth the effort, and you’ll find these focused steps really cut down on overall kitchen stress compared to more complicated recipes. I promise, the payoff is staggering! For simple supporting meals, check out some of my go-to simple weeknight dinners.
Ingredients for the Perfect Chicken Kiev Recipe
Okay, ingredient gathering time! Since we are creating a dramatic centerpiece here, quality really does matter, especially for that rich herb butter filling. I want you to focus on using fresh herbs; the dried stuff just won’t give you that vibrant flavor explosion we need when you slice into it. Remember, Nona always said, ‘Don’t try to hide bad ingredients under fancy technique.’ We are going simple but perfect here, which is the whole point of One Dish Universe!
We need that butter super soft—not melted, just yielding—so it mixes beautifully with the finely minced garlic and fresh parsley. When you pound the chicken, make sure you treat it gently but firmly so it’s even. That even thickness is what guarantees everything cooks at the same rate. Here’s exactly what you need:
For the Herb Butter Filling
- 1/2 cup unsalted butter, softened
- 2 cloves garlic, minced
- 2 tablespoons fresh parsley, chopped
- 1 tablespoon fresh chives, chopped
- 1/2 teaspoon salt
- 1/4 teaspoon black pepper
For the Breaded Chicken Breast
- 4 boneless, skinless chicken breasts, pounded to 1/2 inch thickness
- 1 cup all-purpose flour
- 2 large eggs, beaten
- 2 cups panko breadcrumbs (don’t skimp on the panko!)
- Vegetable oil, for frying (about 2 inches deep)
Mastering the Herb Butter Filling for Your Chicken Kiev Recipe
Now we get to the heart of the matter—the liquid gold inside! This step is non-negotiable for a truly great garlic butter chicken experience. We’re making that rich mixture first, which handles most of the flavor profile for the whole dish.
Grab a bowl and mash together that softened butter with your minced garlic and those beautiful fresh herbs. You want this fully combined; a fork works great to blend everything until it looks uniformly pale green and wonderfully fragrant. Once it’s ready, divide that mixture into four equal amounts. I like to roll mine into little logs using parchment paper, almost like making tiny candies. This makes them super easy to handle later.
Here is where Nona would tap my shoulder and tell me I wasn’t finished yet. You absolutely have to freeze these butter portions until they are rock solid—at least 30 minutes! This is the secret weapon against leaks. If it’s soft when you wrap it in the chicken, it’s game over; you’ll get a fried chicken bomb instead of Kiev. If you can get your hands on some high-quality European-style butter, it really elevates the richness of the final sauce. Seriously, it makes a difference when you want that restaurant-quality result!
The Crucial Sealing Technique for Your Breaded Chicken Breast
Alright, deep breath. This next part is literally the difference between a gorgeous, flowing Center-of-the-Plate moment and a pan full of oily, garlicky chicken soup. We are wrapping our frozen butter core inside the pounded chicken breast, and it needs to be absolutely airtight. Think of it like wrapping a precious secret!
Take one of those rock-solid butter logs and place it right in the center of one of your flattened chicken pieces. Now, you need to fold the chicken over gently but firmly. Start tucking the edges up over the butter. You want every single seam closed up tight. I usually fold the sides in first, like an envelope, and then carefully bring the top and bottom edges together. You are creating a tight package.
Seriously, check your seams twice. Run your fingers all the way around the package, making sure there are no tiny gaps or weak spots. If you see any thin spots on the breaded chicken breast where the meat is too thin, you can even overlap a little bit of the thinner edge over the thicker part. The colder the butter remains, the easier this whole process is. This tight seal is what guarantees you get that molten center later, instead of just fried chicken. Once sealed, you are ready for the coating station! If you are looking for another impressive but easier chicken dish, you must check out my chicken piccata recipe.
Achieving the Crispiest Fried Chicken Kiev Recipe Coating
Now that our little butter packages are sealed up tight, it’s time to build that beautiful, crunchy armor! We need a proper breading station set up, just like you would for any great crispy fried chicken kiev. This is where we transition from raw chicken to something ready for the hot oil.
Set up three shallow dishes side-by-side. The first dish gets your flour, the second gets your beaten eggs, and the third gets those glorious panko breadcrumbs. Remember, we dredged the chicken in flour first to give the egg something to stick to, so don’t skip the flour step!
Take one chicken breast and dredge it thoroughly in the flour—shake off any big clumps. Don’t worry about perfection yet. Next, dunk it completely in the egg mixture, letting any excess drip back into the bowl. Finally, lay it into the panko. Here’s where you need to press! Gently use your hands to make sure the panko adheres everywhere. We are building layers for maximum crunch.
Once everything is coated, put them on a clean plate and back into the fridge for about 15 minutes. This second chill is crucial, I tell you! It lets that breading firm up so it doesn’t disintegrate the second it hits the hot oil.
Expert Tip: Why Double Coating Works for Classic European Recipes
The beauty of this triple-stage coating system—flour, egg, panko—is essential for classic European recipes like this. The flour layer absorbs a tiny bit of the moisture from the egg wash, creating a sticky base. The egg acts as the glue, and the coarse panko creates those deep, crunchy ridges that turn golden brown so perfectly. This structure is what seals every bit of moisture—including that precious butter—inside the meat during frying. It’s a simple science that yields complicated flavor!
Frying Instructions for the Ultimate Chicken Kiev Recipe
Okay, our little treasures are chilled, coated, and ready for the heat! This step delivers the final payoff for your focused work. Frying requires attention, so make sure you’re hanging around the stove. You want that beautiful, even golden color, and that means controlling the temperature precisely.
Get about two inches of vegetable oil heating up in a heavy skillet or a Dutch oven. We are aiming for a steady 350°F (175°C). If your oil is too cool, the breading will soak up grease and get heavy, which is the opposite of what we want for this Chicken Kiev recipe. Too hot, and the outside burns before the inside heats up enough to melt that butter.
Carefully—and I mean carefully—ease one or two of those breaded breasts into the hot oil. Don’t crowd the pan, or the temperature will instantly drop! You need 4 to 6 minutes per side. You want a deep, even golden brown, so turn them gently with tongs as they cook. Once they look perfect, lift them out and place them immediately onto a wire rack lined with paper towels. Don’t just set them on flat paper towels; the rack lets the hot air circulate underneath, which keeps the bottom crisp!
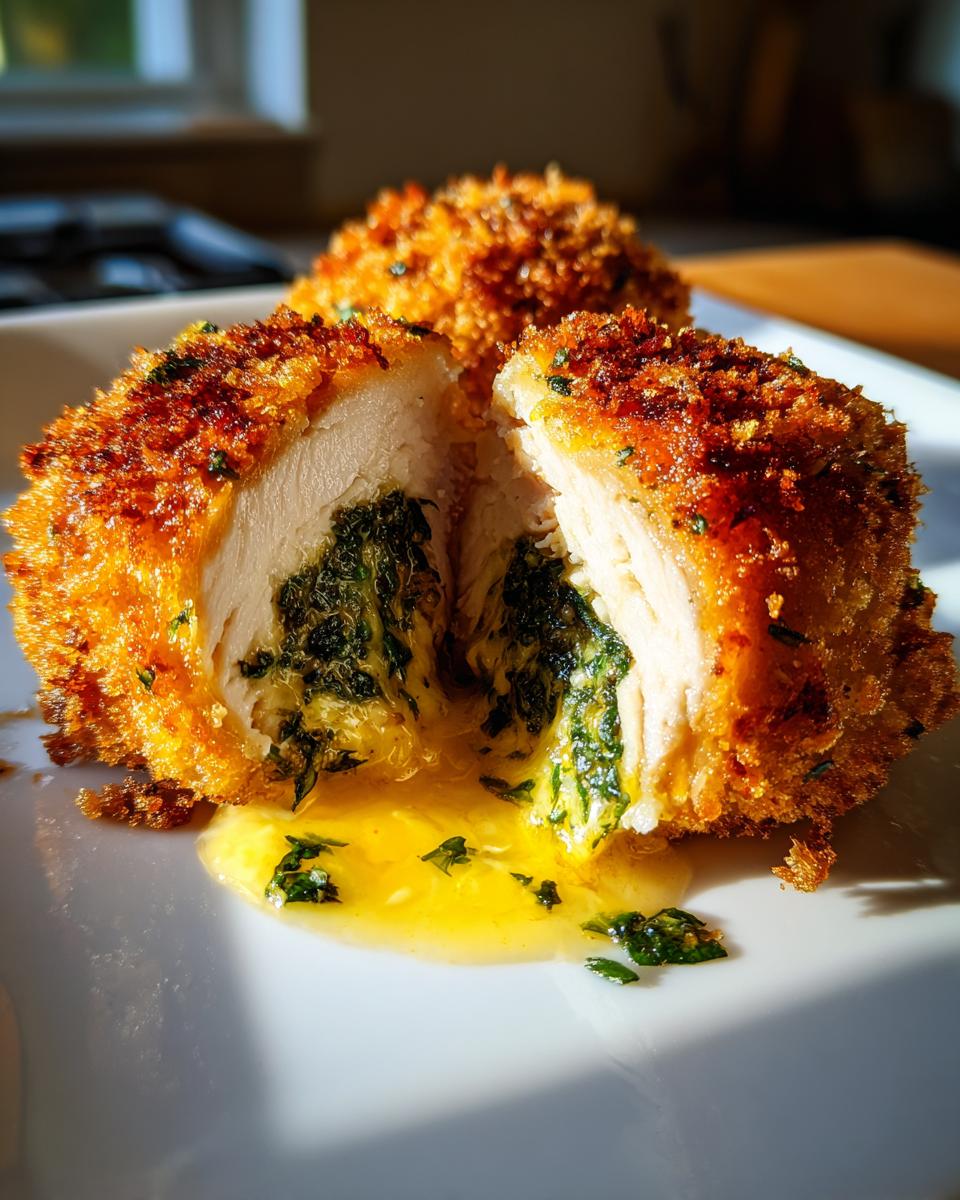
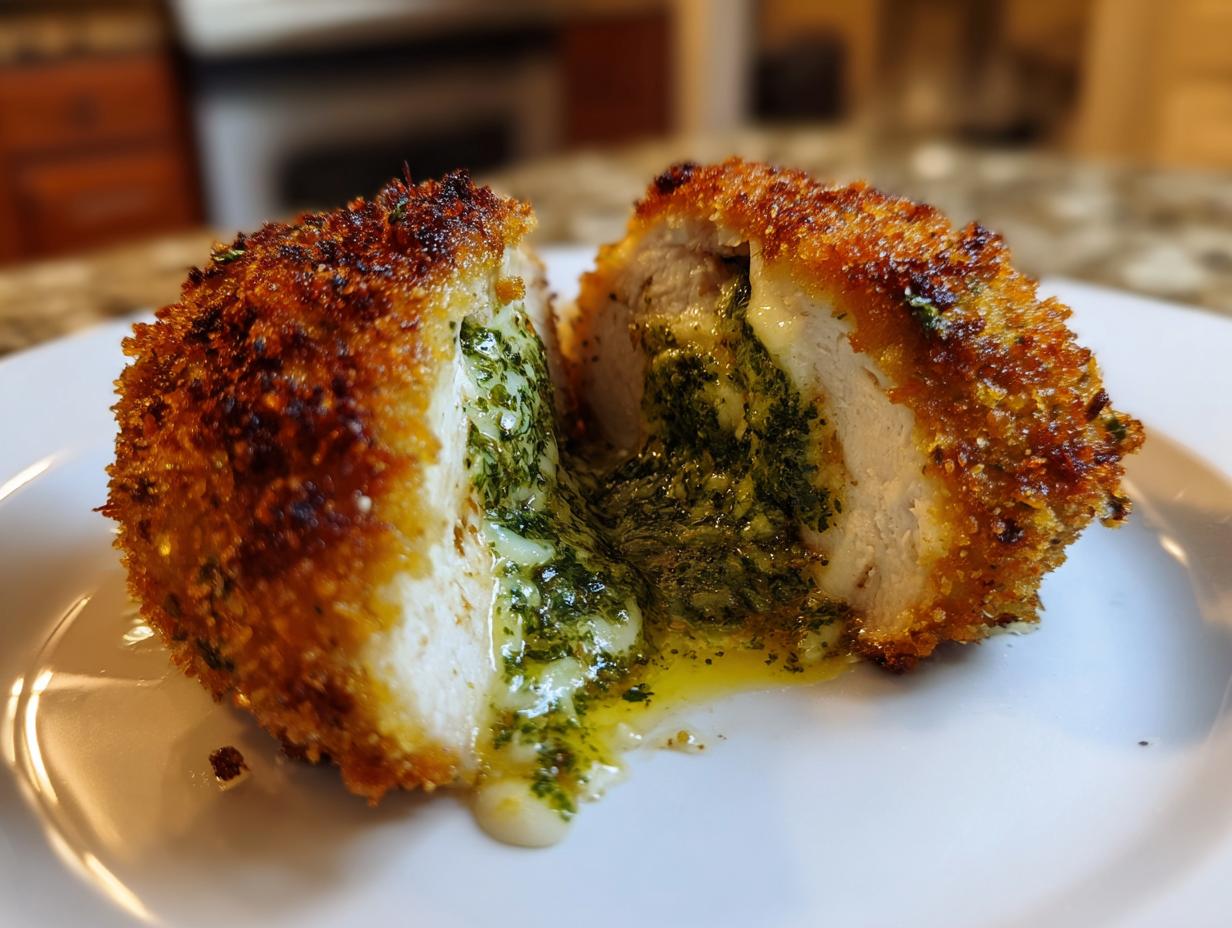
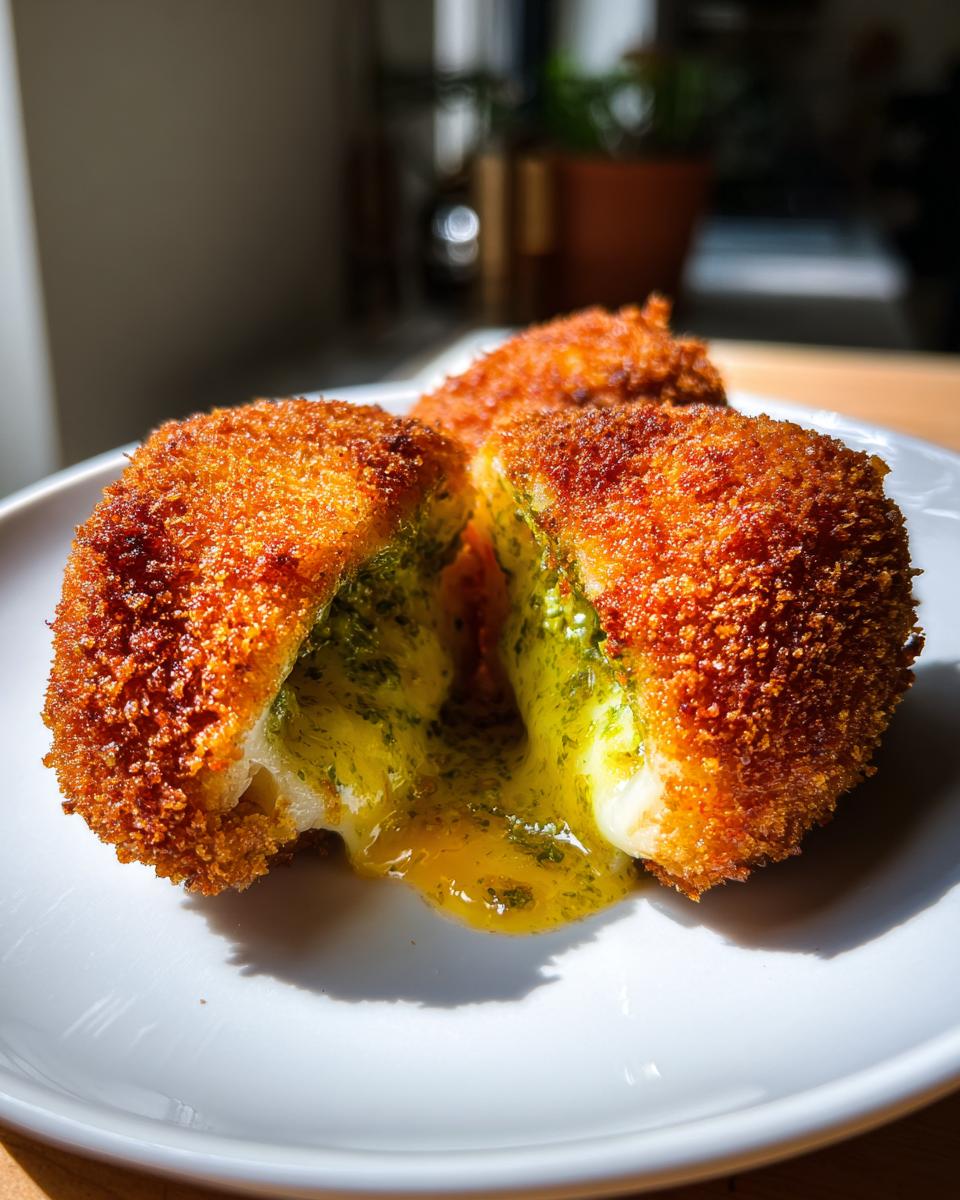
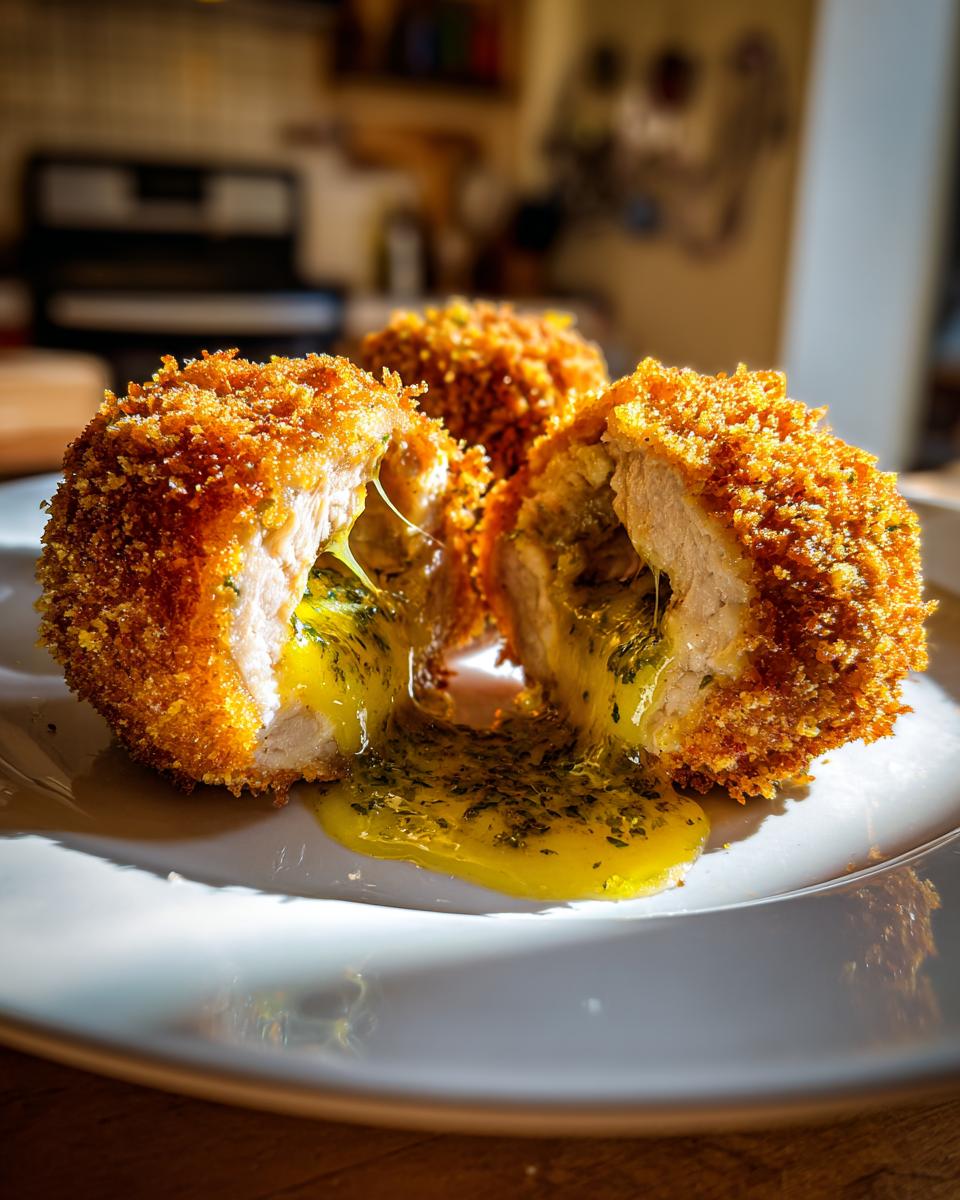
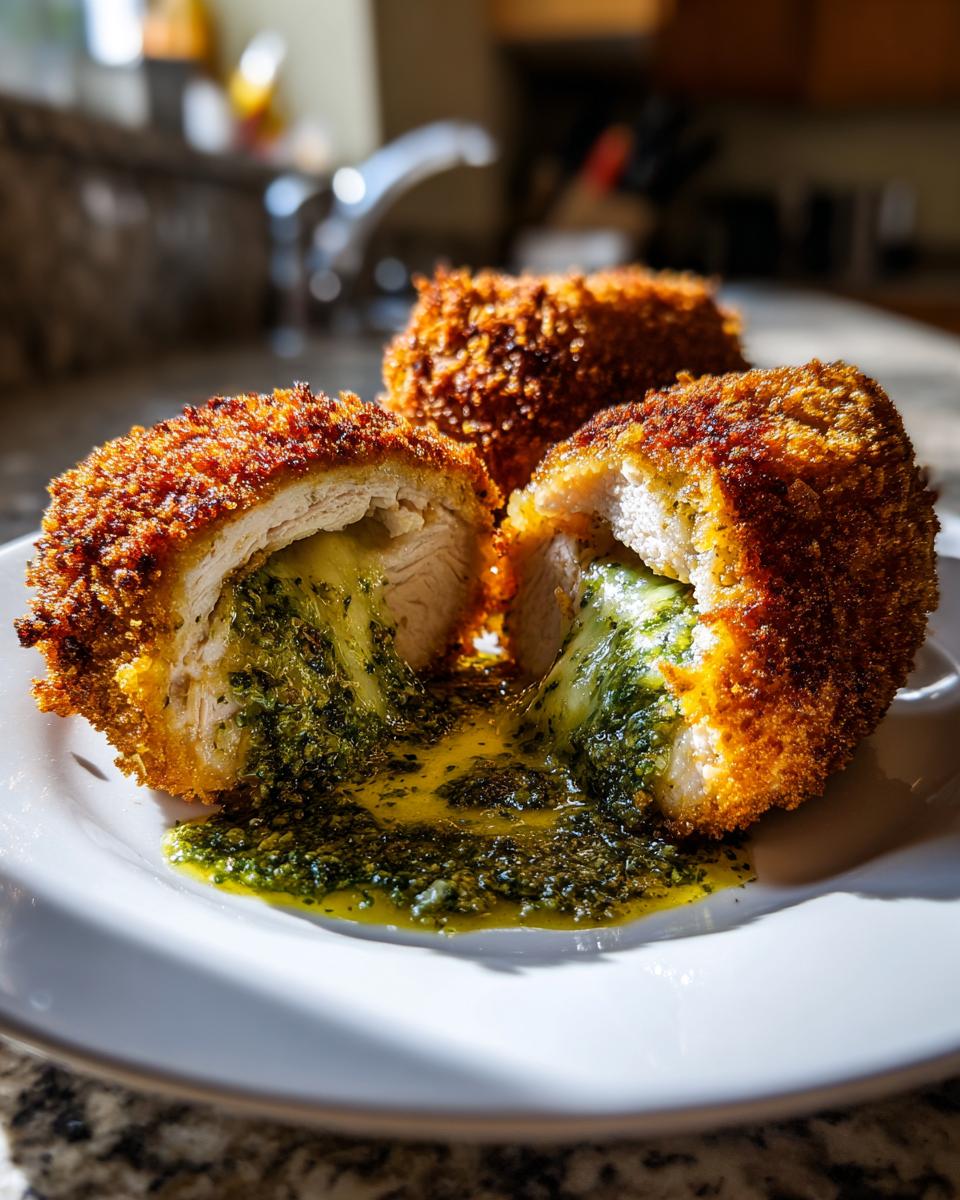
Remove them from the oil and let them rest for just a minute before serving. The smell alone is magnificent, isn’t it? Serve these right away while they are piping hot. Cutting into it at the table to watch that garlic butter chicken sauce flow out is the best part of this whole classic European recipe!
Serving Suggestions for Your Retro Dinner Ideas
You’ve done the work, and now you have this magnificent, buttery centerpiece! Since this Kyiv is rich and satisfying all on its own, we want simple sides that whisper instead of shout. This is pure comfort food, so think classic pairings. Honestly, a perfectly simple steamed green vegetable is all you need, but if you want something a little more elegant, I always suggest a starch to soak up any extra herb butter that escapes.
For this particular set of retro dinner ideas, I love serving it alongside some crispy roast potatoes or maybe some creamy mashed potatoes. If you want a brighter, one-dish kind of pairing that keeps the cleanup minimal, you have to try my roasted asparagus with lemon and Parmesan. Just toss them with olive oil and roast them while the chicken is frying. It brings the necessary brightness to cut through that beautiful richness. Enjoy that moment—you earned it!
Storage and Reheating Instructions for Leftover Chicken Kiev
Okay, let’s talk about the leftovers, because sometimes we make too much (or maybe you just want to savor that incredible texture tomorrow). First thing’s first: you must let the cooked Chicken Kiev cool down completely on that wire rack before you even think about putting it away. If you seal up hot food, you create steam, and steam is the enemy of crispiness!
Once they are totally cool, wrap each one tightly in plastic wrap or place them in an airtight container. They keep beautifully in the fridge for about three, maybe four days. Now, here’s where I need you to listen closely—do *not* microwave these!
Microwaving turns that gorgeous, golden panko shell into sad, damp rubber. We worked too hard for that! If you want that lovely, crispy exterior back, you need dry heat. The best way, honestly, is in the oven. Set your oven to about 375°F (190°C), place the chicken on a baking sheet—maybe even on a wire rack set inside the baking sheet—and heat it for about 12 to 15 minutes, just until it’s heated through and the crust sounds firm again. If you have an air fryer, that is even better! A quick 8 minutes in the air fryer at 350°F will bring the crunch right back to life. This attention to detail is how we keep these classic dishes tasting amazing, even the next day.
Frequently Asked Questions About This Chicken Kiev Recipe
I know this recipe takes a few steps, especially with the freezing and the sealing, which is why I always try to break it down so clearly! It’s totally normal to have a few questions when tackling something this iconic. If you have other questions that aren’t covered here, feel free to reach out via my contact page—I love hearing from home cooks!
Can I bake the Chicken Kiev recipe instead of frying?
You certainly can, especially if you are trying to keep things a little lighter, though I have to be honest, frying gives you that unbeatable, crusty exterior! If you choose to bake, follow all the chilling and sealing steps exactly. Then, pop those breaded breasts into a 400°F (200°C) oven for about 20 to 25 minutes. They bake up nicely, but that signature crispiness you get from the oil is definitely superior for these retro dinner ideas. Just remember, baking won’t achieve the same level of *crispy fried chicken kiev* perfection.
How do I prevent the garlic butter from leaking out?
This is the million-dollar question! Prevention relies on two things we covered, so let’s hit them again. First, that herb butter filling must be frozen solid—hard as a rock! Second, when you fold the chicken around it, you have to press those seams together until they are absolutely fused. If you used the thinner meat from pounding the chicken correctly, you should have enough overlapping material to create a complete seal. If any sneaks out during frying, don’t panic, but it usually means the initial seal wasn’t tight enough.
What is the best way to prepare the herb butter filling ahead of time?
I love making the butter ahead of time! This really helps keep the active cooking time down, which is the core of my philosophy here. You can absolutely mix up the entire garlic butter chicken mixture, roll it into those logs, and freeze them completely. I usually wrap them individually in plastic wrap so they don’t stick together. They stay fantastic in the freezer for up to a week. When you’re ready to wrap the chicken, just pull the logs out of the freezer and work quickly to seal them up before they start to soften too much. It makes the assembly phase so much quicker!
PrintClassic Chicken Kiev with Molten Herb Garlic Butter

Make the perfect retro Chicken Kiev at home. This recipe focuses on achieving a crispy, golden breaded exterior that locks in a molten, herb-rich garlic butter center.
- Prep Time: 30 min
- Cook Time: 15 min
- Total Time: 45 min
- Yield: 4 servings 1x
- Category: Dinner
- Method: Frying
- Cuisine: European
- Diet: Low Fat
Ingredients
- 4 boneless, skinless chicken breasts, pounded to 1/2 inch thickness
- 1 cup all-purpose flour
- 2 large eggs, beaten
- 2 cups panko breadcrumbs
- 1/2 cup unsalted butter, softened
- 2 cloves garlic, minced
- 2 tablespoons fresh parsley, chopped
- 1 tablespoon fresh chives, chopped
- 1/2 teaspoon salt
- 1/4 teaspoon black pepper
- Vegetable oil, for frying
Instructions
- Prepare the herb butter: In a small bowl, combine the softened butter, minced garlic, parsley, chives, salt, and pepper. Mix until fully combined.
- Divide the butter mixture into four equal portions. Roll each portion into a small log shape and place them on parchment paper. Freeze for at least 30 minutes until solid.
- Place one frozen butter portion in the center of a flattened chicken breast. Fold the chicken tightly around the butter, ensuring all edges are completely sealed to prevent leakage during cooking. This step is crucial for a molten center.
- Set up a standard breading station: one shallow dish with flour, one with beaten eggs, and one with panko breadcrumbs.
- Dredge each sealed chicken breast first in flour, shaking off excess. Then dip in the egg, allowing excess to drip off. Finally, coat thoroughly in panko breadcrumbs, pressing gently to adhere.
- Chill the breaded chicken breasts for 15 minutes to help the coating set.
- Heat about 2 inches of vegetable oil in a deep skillet or Dutch oven to 350°F (175°C).
- Carefully place the chicken breasts into the hot oil, ensuring not to overcrowd the pan. Fry for 4 to 6 minutes per side, turning gently, until the crust is deep golden brown and crispy.
- Remove the chicken from the oil and place on a wire rack lined with paper towels to drain excess oil.
- Serve immediately. Cut the chicken in half at the table to release the garlic butter filling.
Notes
- For the best seal, use a meat mallet to thin the chicken evenly before stuffing.
- If you prefer baking over frying, bake at 400°F (200°C) for 20-25 minutes after chilling the breaded chicken.
- Use high-quality panko breadcrumbs for the best crispy fried chicken kiev texture.
Nutrition
- Serving Size: 1 breast
- Calories: 550
- Sugar: 1
- Sodium: 450
- Fat: 35
- Saturated Fat: 18
- Unsaturated Fat: 12
- Trans Fat: 0
- Carbohydrates: 25
- Fiber: 2
- Protein: 38
- Cholesterol: 150