
You know that dessert that stops everyone mid-sentence when you bring it to the table? That’s the Chocoflan. Seriously, watching the chocolate cake and the creamy flan magically switch places in the oven is like witnessing kitchen alchemy. It’s the showstopper centerpiece you didn’t know you needed, especially if you’re planning any festive dinners for Cinco de Mayo.
When I started One Dish Universe, I wanted to bring my Nona’s wisdom into your kitchen—the idea that big celebrations don’t need complex, overwhelming recipes. This impossible cake recipe is absolutely perfect for that philosophy. It looks incredibly complicated, but honestly, it’s built on the simplest concept: good layers doing their own thing in the heat. Trust me, this Chocoflan is going to be your new favorite party trick, made with the honest, simple approach to food that Nona taught me. You can read more about our philosophy and my background with Nona over at our story page.
- Why This Chocoflan is the Ultimate Centerpiece Dessert
- Gathering Ingredients for Your Chocoflan
- Step-by-Step Guide to Making Chocoflan at Home
- Tips for Perfect Chocoflan Layer Separation
- Storing and Reheating Your Chocoflan
- Frequently Asked Questions About Chocoflan
- Estimated Nutritional Data for Chocoflan
- Share Your Experience Making This Chocoflan
Why This Chocoflan is the Ultimate Centerpiece Dessert
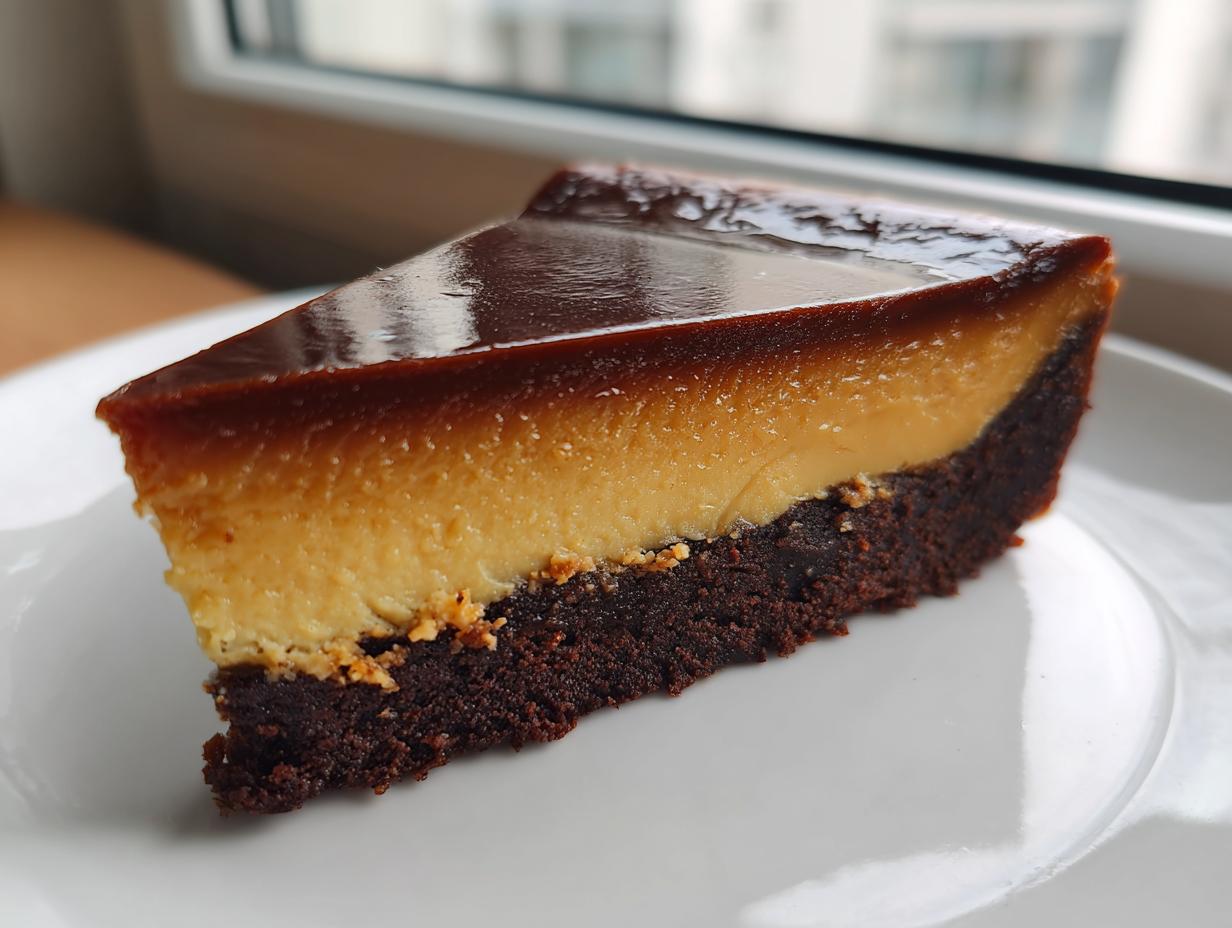
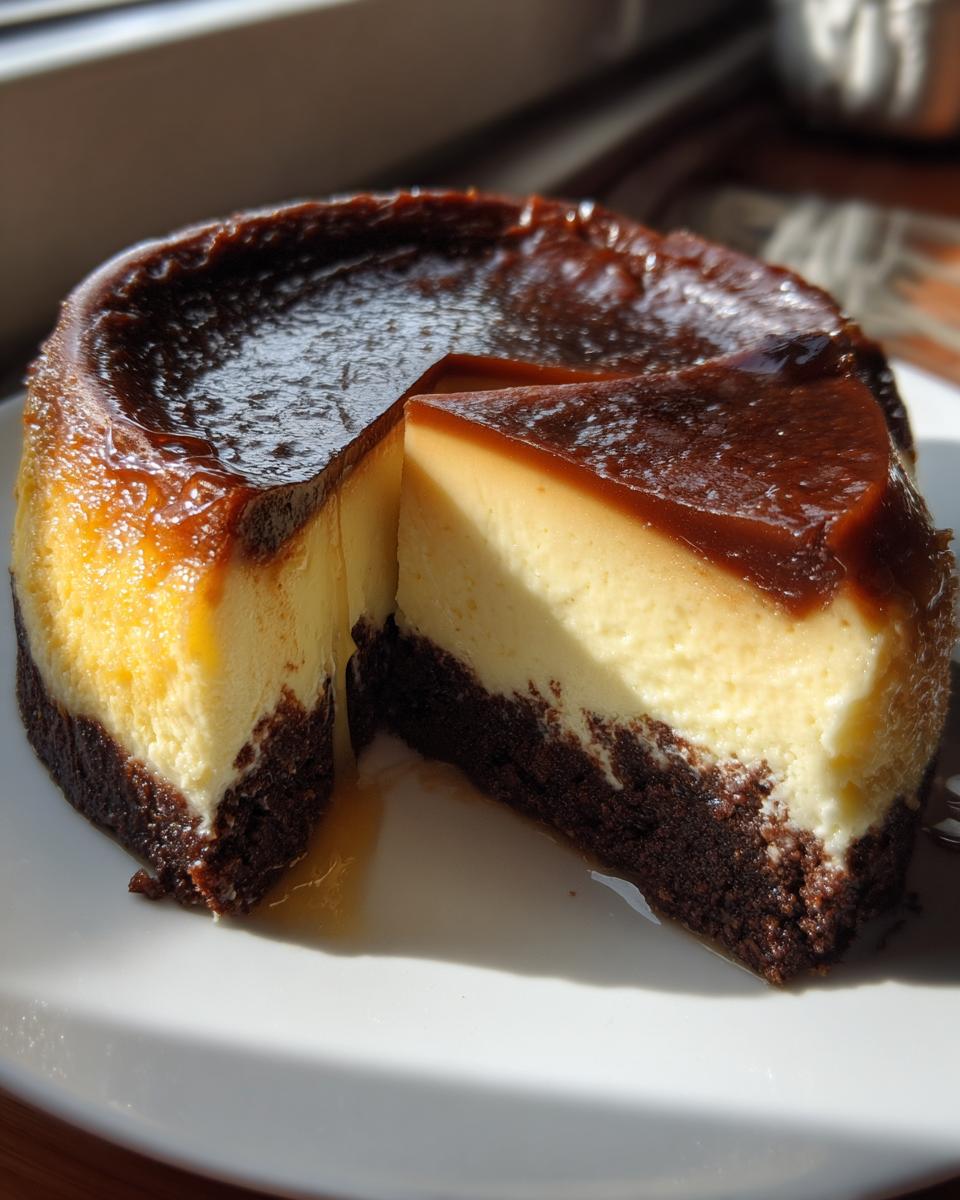
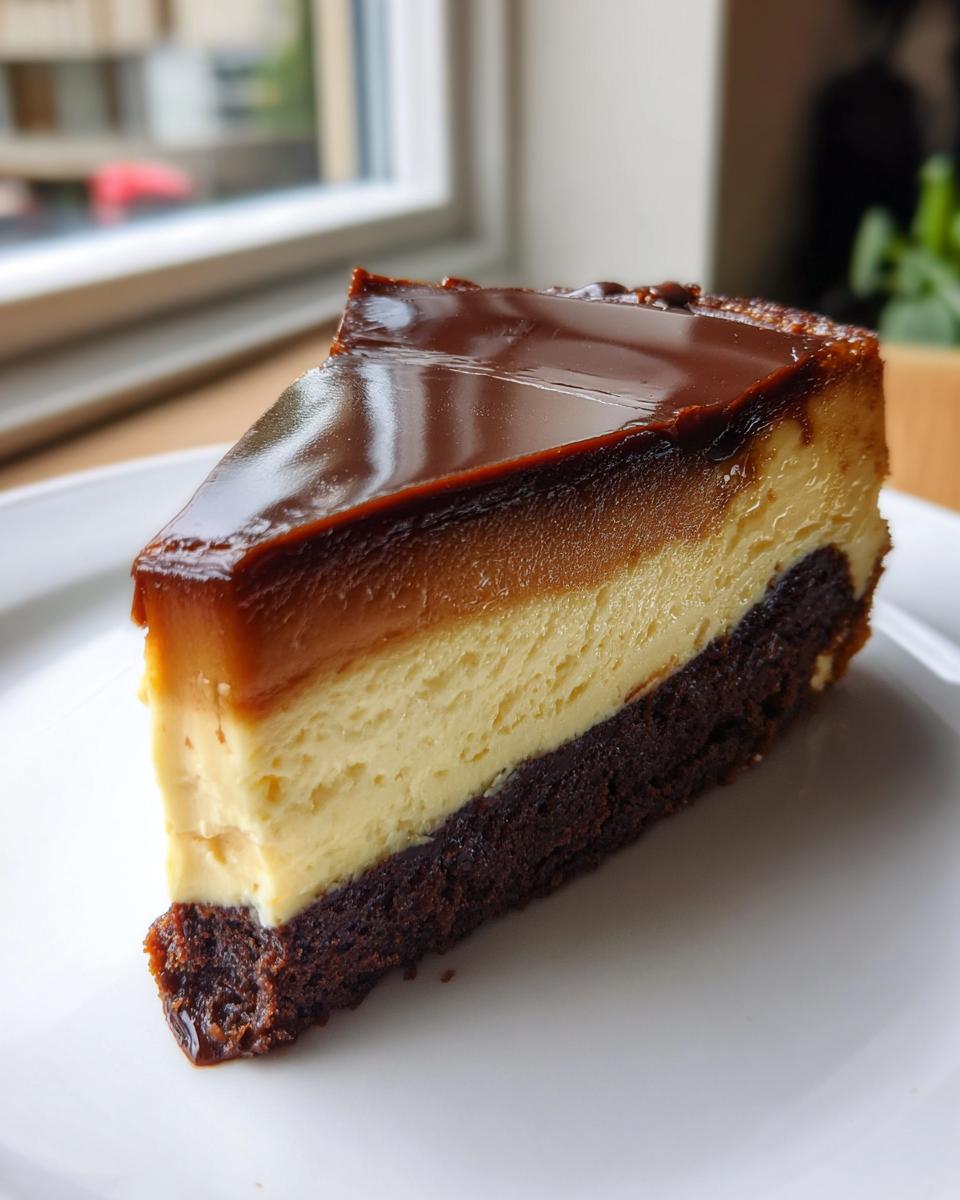
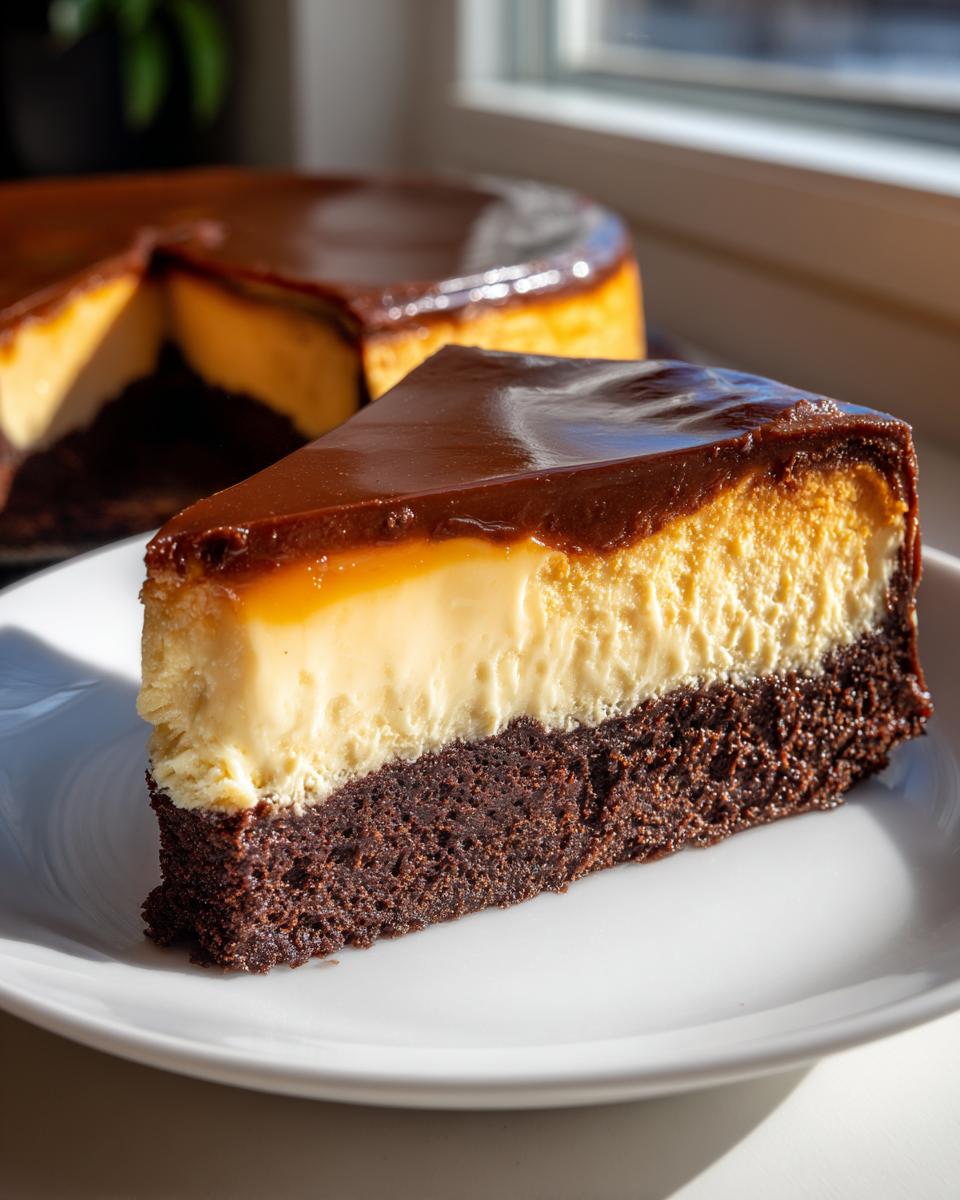
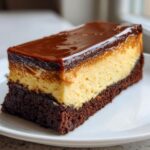
This isn’t just another one of those pretty cinco de mayo desserts; this is drama on a platter! What makes the Chocoflan so coveted is that moment when you invert the pan and realize the dessert staged a total switcheroo on you. It’s unbelievable! I remember the first time Nona made it; I seriously thought she’d layered it wrong, but then watching the dense caramel and flan sink while the cake batter rose? Wow. It’s one of those genuinely satisfying layered cake recipes you have to see to believe. It proves that incredible flavor doesn’t need a dozen fiddly steps.

The Magic of the Impossible Cake Recipe
People call it the impossible cake recipe because it defies logic—you pour the cake batter on top, and somehow, the universe sorts it out in the oven! It’s all down to density, honey. The heavy, custard-like flan mixture sinks right through the lighter chocolate cake batter as they bake. By the time it cools, you have two perfectly distinct, gorgeous layers waiting to be revealed. See? Simple physics, maximum impact!
Gathering Ingredients for Your Chocoflan
Alright, let’s talk supplies! One of Nona’s biggest gifts to me was teaching me how to make showstoppers without spending all day prepping. That’s why we are leaning on a store-bought chocolate cake mix here—no shame in that! It keeps the fuss way down so you can focus on that magnificent flan layer. Trust me, using the mix lets you nail that perfect cake texture while we concentrate on the creamy, rich stuff that makes this a true flan cake at home masterpiece. Grab these few simple items, and we are ready to build.
Ingredients for the Creamy Flan Layer
- 1 (14 ounce) can sweetened condensed milk
- 1 (12 ounce) can evaporated milk
- 1 (8 ounce) package cream cheese, softened (make sure this is room temp!)
- 1 teaspoon vanilla extract
Ingredients for the Chocolate Cake Batter
- 1 box chocolate cake mix (plus all the wet ingredients listed on the box—usually eggs, oil, and water!)
- 1 (10 ounce) jar caramel topping (this is the liquid gold that goes on the very bottom!)
Step-by-Step Guide to Making Chocoflan at Home
Okay, now for the assembly! This is where the science truly kicks in to make your flan cake at home look like magic. Don’t rush these steps, especially when it comes to layering in the pan. We need to treat those two distinct mixtures with respect so they know exactly where they belong before the oven tells them to swap places! Follow these steps closely, and you’ll have that beautiful, distinct separation we’re aiming for. Remember, everything needs to happen gently.
Preparing the Pan and Flan Mixture
First up, get that oven going to 350 degrees Fahrenheit and grease your 10-inch tube pan—no sticking allowed! Don’t forget this critical first base layer: pour that whole jar of caramel topping right into the bottom of the pan. That caramel is going to be your gorgeous, shiny topping later. Next, for your flan layer, whisk together the sweetened condensed milk, evaporated milk, softened cream cheese, and vanilla until it’s perfectly smooth. Pour that smooth flan mixture right over the caramel base. It’s liquid gold!
Assembling the Layers for the Chocoflan
Now, mix up your chocolate cake batter according to the box directions, but stop when it’s just combined—we can’t overmix here! This is the fun part: using a large spoon or a very gentle ladle, carefully spoon the cake batter right over the top of the liquid flan layer. Because the cake batter is much lighter than the flan, it should actually float right on top! Resist the urge to stir or push it down. We’re setting up a competition, and we want the layers to stay where we put them… for now!
Baking and Setting the Mexican Chocolate Flan
To make sure everything cooks evenly without boiling over, place your cake pan into a larger roasting pan. Fill the larger pan with hot water until it reaches halfway up the side of your cake pan—that’s your water bath, or *bain-marie*! Bake this for about 60 to 75 minutes. A toothpick should come out clean from the cake part, but don’t worry if the middle is still a little soft; that’s the flan setting. Once out, let it cool completely before you wrap it up and hide it in the fridge. Seriously, chill this Mexican chocolate flan overnight if you can! That cooling time is non-negotiable for success.
The Grand Reveal: Unmolding Your Chocoflan
When you’re ready, run a thin, sharp knife around the edges of the cooled cake to loosen everything up. Get your biggest, prettiest serving plate and place it upside down over the top of the pan. Take a deep breath, hold the plate and pan tightly together, and flip it over quickly in one decisive motion! Lift the pan away slowly. If you chilled it long enough, the layers will have settled, and that rich caramel topping should now be draped perfectly over your gorgeous chocolate cake and flan.
Tips for Perfect Chocoflan Layer Separation
Look, even when you follow the rules, sometimes the universe decides to be messy, right? Getting that razor-sharp division between the chocolate layer and the creamy custard is the real challenge in this Mexican chocolate flan. If you want that perfect flip every single time, you need to focus on a few key checkpoints that I learned the hard way.
Achieving the Best Results with Your Chocoflan
First, the water bath. Don’t just use warm tap water; use genuinely *hot* water when you fill that outer roasting pan. That initial heat helps kickstart the cooking process evenly. Second, please, please, make sure that cream cheese for your flan is truly soft—room temperature soft. If you drop cold lumps of cheese in there, you’ll never get that smooth base, and the density won’t be right. And finally, that chilling time isn’t a suggestion; it’s a requirement! Four hours is the minimum, but I always tell people, if you want the very best, seal that thing up and wait until morning. It sets everything into place so beautifully.
Storing and Reheating Your Chocoflan
Since this gorgeous dessert is loaded with dairy from the cream cheese and milks, keeping it cold is super important for safety and texture! You absolutely must store your leftover Chocoflan covered in the refrigerator. Honestly, it tastes even better on day two once those layers have totally settled in. If you’re wondering about warming it up? Don’t! Flan really doesn’t like heat after it sets. If you absolutely must take the chill off a slice, let it sit on the counter for maybe 15 minutes before serving, but it shines best served straight from the cold!
Frequently Asked Questions About Chocoflan
It happens! Sometimes when you’re trying a new trick like making an impossible cake recipe, you end up with questions. That’s perfectly normal, and those little bumps are how we learn to make it better next time. I’ve gathered a few things people often ask me after they try this Chocoflan for the first time. Let’s troubleshoot!
Can I make this Chocoflan without a tube pan?
You absolutely can, but it changes the visual impact a little bit. If you use a 9×13 inch pan, you’ll still get the two layers of chocolate cake and flan, but because the layers will be much thinner, that dramatic switch might not look as obvious when you cut into it. If you go that route, just make sure you use the water bath like we discussed, and remember that the baking time might change—keep an eye on it!
Why did my flan layer sink to the bottom?
This is the biggest worry people have, and usually, it comes down to one of two things. Did you remember to use that hot water bath (the *bain-marie*)? That jacket of water keeps the flan gentle so it can sink without boiling the cake batter. The only other reason I usually see this happen is if the cake batter was mixed way too much. Overmixing develops gluten, making the batter heavier than it should be, so it doesn’t float sweetly on top of the flan layer. Be gentle with that chocolate mix!
Estimated Nutritional Data for Chocoflan
Now, Nona always believed that when you gather around the table for a celebration, you shouldn’t worry about counting every little thing, but I know some of you busy folks out there appreciate knowing what you’re serving. Since this is a rich, celebratory dessert—definitely not an everyday thing!—it does pack a punch. This is based on 12 generous servings of that glorious Chocoflan.
Keep in mind, these are just estimates, you know? If you used a low-fat cake mix or used light cream cheese, your numbers will shift slightly. But generally, this is what you’re looking at per slice:
- Serving Size: 1 slice
- Calories: 350
- Sugar: 45g (That caramel has to go somewhere!)
- Protein: 8g
- Fat: 15g (Mostly from the cream cheese and butter in the cake mix!)
- Carbohydrates: 50g
- Cholesterol: 40mg
Serve it cold with a cup of strong coffee, and forget the numbers for five glorious minutes. That’s what my Nona always advocated for—enjoying the moment, not stressing the details!
Share Your Experience Making This Chocoflan
Whew! You did it! You’ve navigated the beautiful mystery of the Chocoflan, and I honestly can’t wait to see your results. Did those layers switch places just like magic? I want to know about your grand reveal! Seriously, when that caramel cascades over the top, you have to capture that moment.
Please take a picture of your finished dessert and tag us! Seeing your family gather around this stunning, yet simply made, centerpiece reminds me exactly why I developed these recipes—the joy of getting people together around good, honest food without creating a huge mess.
If you loved how straightforward this layered cake recipe turned out, or if you have a genius tip I missed, don’t keep it to yourself! Head over to the site and leave a quick rating while you’re there. And if you run into any weird issues next time or just want to share how long it lasted on your counter (mine never lasts long!), feel free to reach out to me directly through the contact page. Happy baking, and enjoy that impossible cake!
PrintChocoflan: The Impossible Layer Cake Recipe
Make this Mexican chocolate flan, often called impossible cake, where the chocolate cake and creamy flan layers magically switch places while baking. A perfect centerpiece for Cinco de Mayo.
- Prep Time: 20 min
- Cook Time: 75 min
- Total Time: 95 min
- Yield: 12 servings 1x
- Category: Dessert
- Method: Baking
- Cuisine: Mexican
- Diet: Vegetarian
Ingredients
- 1 box chocolate cake mix (plus ingredients listed on box)
- 1 (14 ounce) can sweetened condensed milk
- 1 (12 ounce) can evaporated milk
- 1 (8 ounce) package cream cheese, softened
- 1 teaspoon vanilla extract
- 1 (10 ounce) jar caramel topping (for topping)
Instructions
- Preheat your oven to 350 degrees Fahrenheit. Lightly grease a 10-inch tube pan or bundt pan.
- Pour the caramel topping evenly into the bottom of the prepared pan.
- In a medium bowl, combine the sweetened condensed milk, evaporated milk, softened cream cheese, and vanilla extract. Beat with an electric mixer until smooth. This is your flan mixture.
- Pour the flan mixture slowly over the caramel layer in the pan.
- Prepare the chocolate cake batter according to the package directions. Do not overmix.
- Carefully spoon the chocolate cake batter over the flan layer. The batter will float on top of the liquid flan mixture.
- Place the pan in a larger roasting pan. Fill the roasting pan with hot water until the water reaches about halfway up the sides of the cake pan. This creates a water bath.
- Bake for 60 to 75 minutes, or until a toothpick inserted near the center comes out clean (the flan layer will still be soft).
- Remove the cake pan from the water bath and let it cool completely on a wire rack.
- Once cool, cover the pan and refrigerate for at least 4 hours, or preferably overnight. This chilling is necessary for the layers to set.
- To unmold, run a thin knife around the edges of the pan. Place a large serving plate upside down over the pan. Invert the pan and plate together quickly. The flan should release onto the plate, with the caramel topping now on top.
Notes
- For the best layer separation, chill the cake overnight before attempting to invert it.
- Use a high-quality caramel topping for the best flavor contrast with the chocolate cake.
- This recipe works well in a 9×13 inch pan if you prefer a sheet cake style, but baking time may vary.
Nutrition
- Serving Size: 1 slice
- Calories: 350
- Sugar: 45g
- Sodium: 300mg
- Fat: 15g
- Saturated Fat: 8g
- Unsaturated Fat: 7g
- Trans Fat: 0g
- Carbohydrates: 50g
- Fiber: 2g
- Protein: 8g
- Cholesterol: 40mg