
Okay, stop scrolling right now if you’ve been searching for that show-stopping dessert that screams ‘eccentric maximalist’ for your upcoming celebration. We aren’t just making a cake; we are constructing a piece of edible art! If you’re channeling that ‘Glitchy Glam’ vibe for May the 4th, you need the dazzling shine of a perfect **Galaxy cake**. When I first started exploring these techniques—blending the scientific precision I learned professionally with the sheer joy of fandom—I knew this mirror glaze method was the key. Trust me, mastering this high-shine finish turns a simple bake into an unbelievable statement piece. For more on how Elena Valdez built this philosophy around achievable artistry, you can check out our story here.
- Why This Galaxy Cake is Your Ultimate Artistic Exploration Baking Project
- Essential Components for Your Galaxy Cake
- Step-by-Step Guide to the Perfect Mirror Glaze Cake
- Tips for Success with Your Mirror Glaze Cake
- Serving Suggestions for Your Star Wars Birthday Cake
- Storage and Reheating Instructions
- Frequently Asked Questions About Space Themed Desserts
- Understanding the Nutrition of Your Galaxy cake
- Share Your Artistic Baking Creations
Why This Galaxy Cake is Your Ultimate Artistic Exploration Baking Project
Honestly, if you’re hosting a gathering that demands something truly dramatic, forget plain buttercream. This recipe is for those of us who love that ‘Dark Romantic’ feel—deep, moody colors that sparkle under the lights. It’s a completely different level of presentation for your space themed desserts. While it looks intimidating, that mirror glaze finish is exactly what delivers that slick, almost liquid depth that makes people stop and stare. It’s the ultimate technical challenge that pays off huge in visual impact, making it perfect for your ‘Glitchy Glam’ May the 4th party.
Achieving the Nebula Cake Frosting Effect
Standard frosting just can’t capture that infinite, black void of space, can it? That’s why we use the mirror glaze cake technique for this nebula cake frosting. The high shine reflects light perfectly, creating illusions of distant stars and swirling gas clouds. It’s all about that intense visual pop! You simply can’t get that mesmerizing, deep-focus effect doing anything else. It’s worth the effort!
Time Commitment and Simplicity (One Dish Universe Promise)
Now, I know what you’re thinking: ‘That sounds like hours of cleanup!’ But here’s the beauty; once the glaze is done, it’s all contained on one drip sheet below your wire rack. We tackle the technical part, pour it quickly, and then—done! It aligns perfectly with Elena’s vision: complex beauty achieved through streamlined, focused steps. Less time cleaning up gloppy frosting, more time admiring your cosmic masterpiece.
Essential Components for Your Galaxy Cake
Alright, time to get organized! Before you even think about heating syrup, your cake needs to be totally ready for its cosmic makeover. That means we need a standard 8-inch base cake—any recipe you love works, but it absolutely MUST be deep frozen. This chilled canvas is crucial for a smooth mirror glaze cake finish. Let’s look at what you need to pull off this incredible look.
Ingredients for the Mirror Glaze Cake
- 1 standard 8-inch mirror glaze base cake (your favorite recipe)
- 1 cup white chocolate, finely chopped
- 2/3 cup sweetened condensed milk
- 1/2 cup granulated sugar
- 1/4 cup water
- 1/2 cup glucose syrup or light corn syrup
- 1 tablespoon powdered gelatin
- 1/4 cup cold water (for blooming gelatin)
- Gel food coloring (black, deep blue, purple, pink, white)
- Edible silver or gold glitter dust
Step-by-Step Guide to the Perfect Mirror Glaze Cake
Okay, this is where the magic happens, and honestly, where the science part Elena loves comes in! Precision here means you get that incredible, flawless finish on your galaxy cake. Don’t rush, but be methodical. Once we start pouring, speed becomes important, so have everything ready to go well before you start combining things.
Preparing the Base and Blooming Gelatin
First thing’s first: your cake needs a deep chill! Make sure your 8-inch base cake is completely frozen solid. Set it up on a wire rack suspended over a baking sheet—this catches all the extra glaze so cleanup is honestly pretty simple, which I love! Then, handle that gelatin: sprinkle the tablespoon over 1/4 cup of cold water and just let it sit for about five minutes. It’s going to get wrinkly; that’s called blooming, and it’s essential so it melts smoothly later.
Creating the Syrup and Chocolate Base
Next step is making the sugar syrup. In a saucepan, dissolve your sugar in 1/4 cup of water over medium heat; don’t stir it once it starts boiling, just let it go until it hits 220 degrees Fahrenheit. Pull it off the heat and immediately add your glucose syrup. Pour that hot syrup right over your chopped white chocolate and the condensed milk in a heatproof bowl. Let it sit for exactly two minutes—patience!—and then stir it until it shines and looks completely smooth.
Incorporating Gelatin and Achieving a Smooth Mirror Glaze Cake
Gently warm up that bloomed gelatin until it’s totally liquid—seriously, do not let it boil, or you’ll ruin its setting power! Whisk that liquid right into your chocolate mixture until everything is completely unified. Look, no lumps are allowed if you want that perfect, reflective surface for your mirror glaze cake. So, pour the whole batch through a fine-mesh sieve into a clean measuring cup. This simple strain makes all the difference!

Coloring and Temperature Control for Pouring
Now for the fun, artistic chaos! Divide the glaze into several bowls. I keep the biggest portion black, then color the rest blue, purple, and pink. The absolute, most important rule for this entire process? You MUST let the glazes cool down to between 90 and 95 degrees Fahrenheit. If it’s too hot, it runs right off the frozen cake. Too cool, and it globs up. Hitting that 90–95°F sweet spot is the secret key to a beautiful, smooth galaxy cake application.
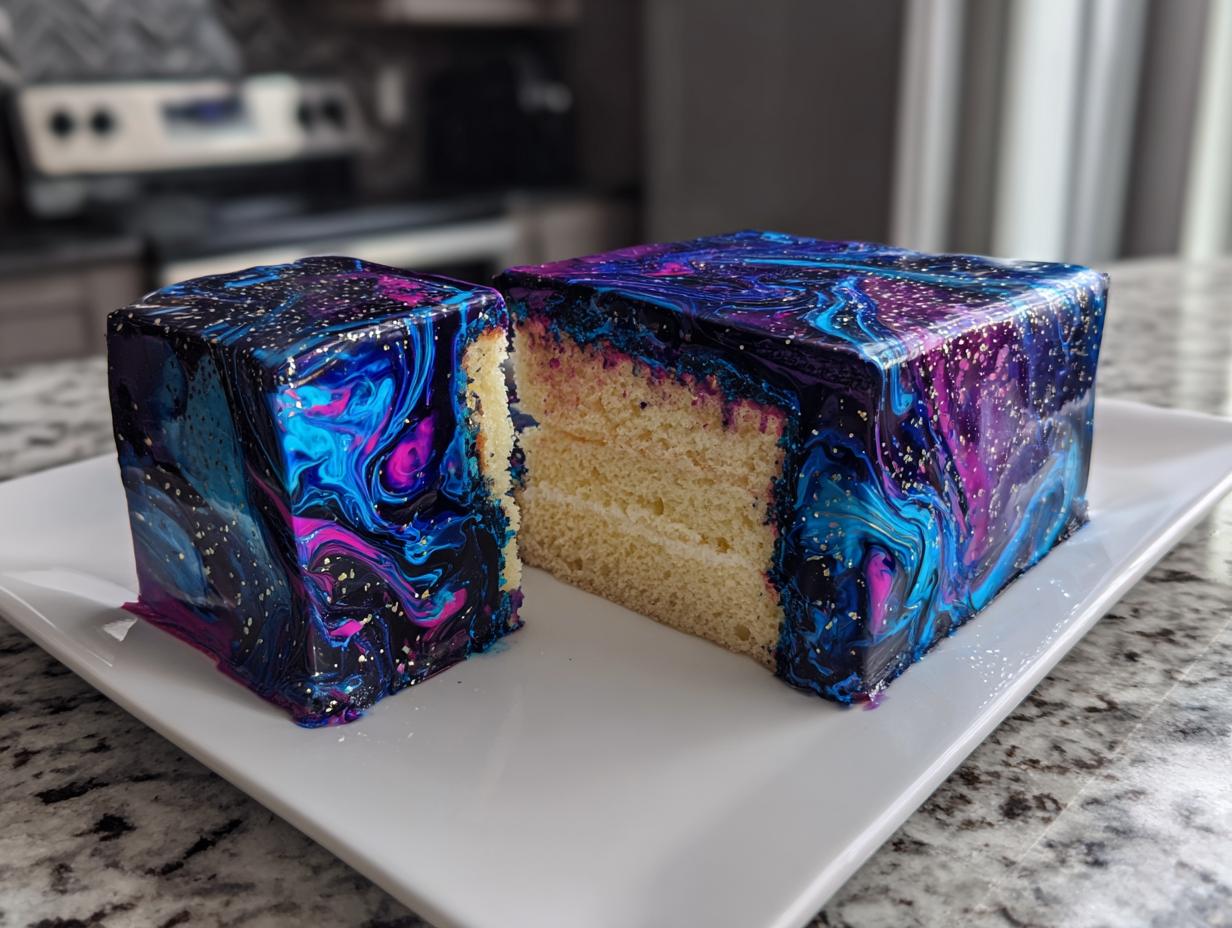
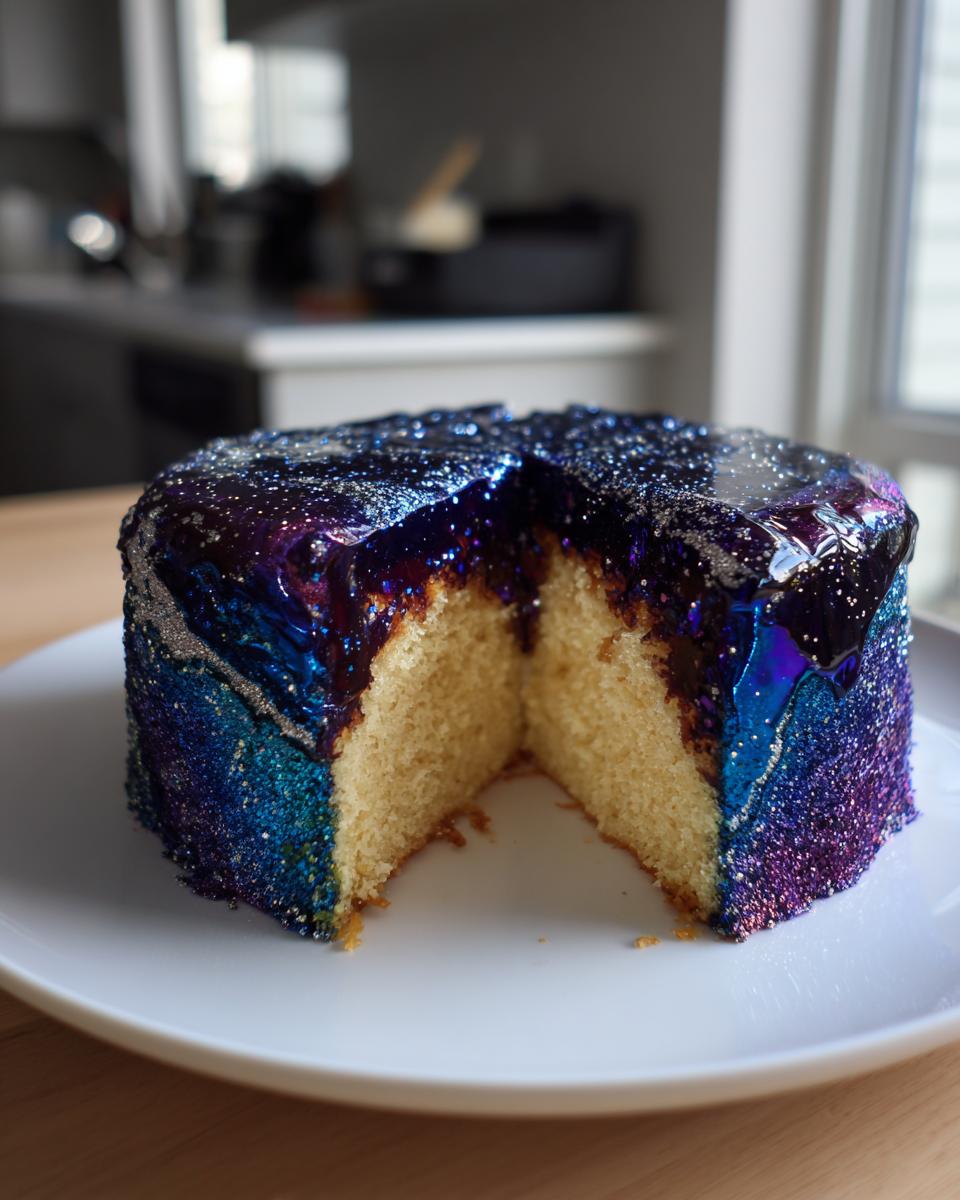
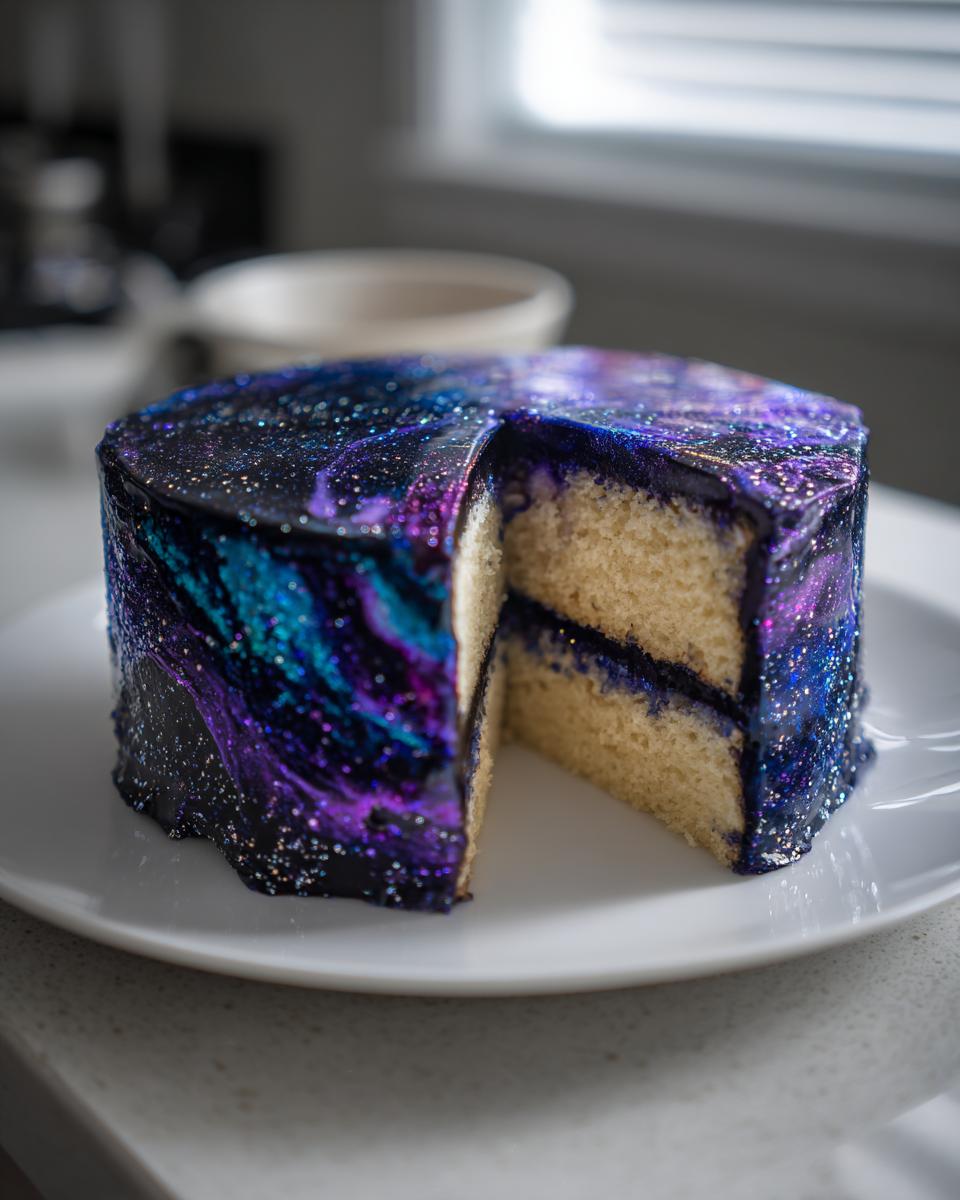
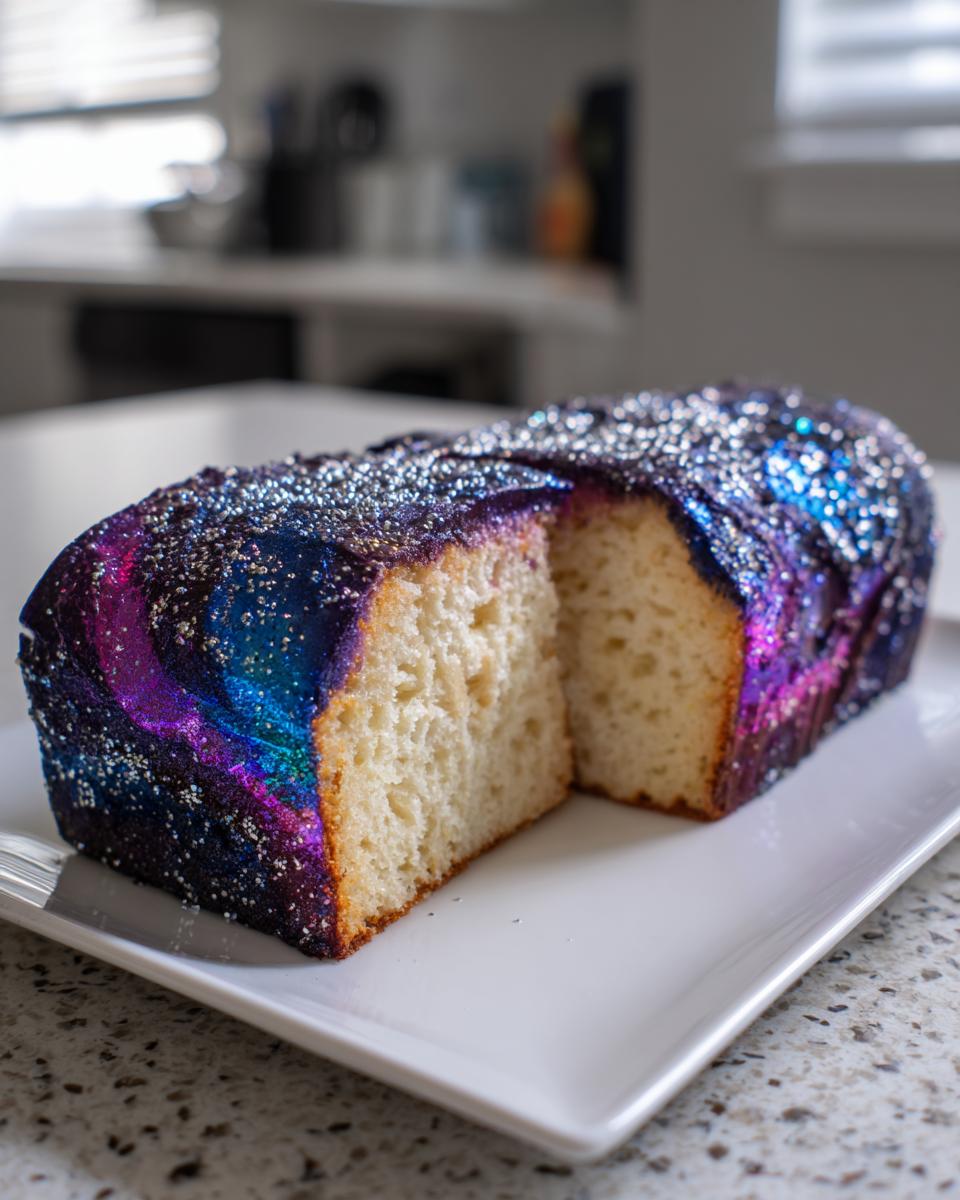
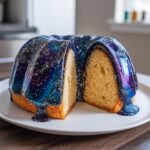
The Nebula Pour and Star Dust Application
When you hit that temp, pour your black glaze over the entire frozen cake quickly and evenly. You must work immediately after! While the black is still wet, randomly drizzle tiny lines of your blue, purple, and pink colors right on top. Take a toothpick and swirl the colors together just once or twice—very gently!—to get that gorgeous, wispy nebula effect. Don’t overmix! Then, while it’s still wet, lightly dust (don’t dump!) on that edible silver or gold glitter dust to create your starry background. Give it five minutes to set up before you carefully move it to its final serving plate.
Tips for Success with Your Mirror Glaze Cake
Listen, executing a beautiful mirror glaze cake like this is all about having a smooth workflow. It looks complex, but if you respect the temperature and the timing, you’ll nail that deep, moody look we’re going for. Don’t panic if things feel like they are moving too fast once you start pouring. It’s that blend of speed and slight hesitation that gives you that lovely, chaotic color blend.
Working Quickly for the Best Marble Effect
Once that first layer of black hits the frozen cake, you have about 30 seconds before it starts setting up and locking the surface. This is your window! You need to drizzle those accent colors—the blues and purples—and do your single, gentle swirl immediately. Remember, for that ‘Dark Romantic’ vibe, we want distinct, swirling rivers of color, not a muddy mess. Speed is genuinely your friend here so the colors don’t fully incorporate.
Reheating Techniques for Thick Glaze
If you’re taking too long coloring your small portions, or if the room is a little chilly, your leftover glaze might start to thicken up on you. If that happens, don’t even think about putting it in the microwave! That’ll make it seize up or boil. Instead, set your bowl carefully inside a larger bowl filled with just warm—not boiling—water. Let it sit for a minute until it loosens up and hits that sweet spot of pourable consistency again. It’s surprising how resilient the glaze is if you just treat it gently!
Serving Suggestions for Your Star Wars Birthday Cake
When you’ve gone to this much trouble to create the ultimate Galaxy cake, you have to make sure the serving presentation lives up to the drama! Since this is a maximalist showstopper, I always recommend keeping the sides simple so the glaze truly shines. Forget fussy towers of whipped cream! We want the mirror glaze to be the star. Try pairing a slice with a plain, high-quality vanilla bean ice cream, or maybe some dark, glossy berries like blackberries or black cherries. Their slight tartness cuts through the sweetness of the glaze beautifully. This way, your stunning Star Wars birthday cake takes center stage perfectly!
Storage and Reheating Instructions
Okay, this is critical because the beautiful shine we worked so hard on can easily get ruined by bad storage! Because the mirror glaze cake has that gelatin setting, never, ever try to freeze your finished, glazed cake. That freezing and thawing process is just going to break the glaze and make it weep and get dull. Keep it refrigerated, but make sure it’s covered loosely to protect the surface from picking up any fridge odors.
When you take it out to serve, let it sit on the counter for maybe 15 to 20 minutes just to take the deep chill off the actual cake layers. But honestly, reheating isn’t really a thing for this kind of dessert. It’s designed to be served cool so that glaze stays firm and glassy. If you try to heat it up, you’ll just end up with a puddle that defeats the whole purpose of making a perfect galaxy cake!
Frequently Asked Questions About Space Themed Desserts
I totally get it—when you tackle something this visually intense, you’re going to have questions! Usually, they boil down to how to keep that shiny look perfect or how to adapt the theme. I’ve pulled together the most common things I hear from folks tackling their first big space themed desserts project. Don’t let the technical terms scare you; we can sort through them!
Can I use buttercream instead of mirror glaze for my Galaxy cake?
You totally *can* use buttercream, sure, but if you’re going for that deep-space, galactic look, you’re going to miss the mark, honestly. Buttercream, even when colored beautifully, is matte. It doesn’t have that liquid, ultra-high-gloss reflection. For this particular aesthetic—that ‘Glitchy Glam’ look—the mirror glaze is non-negotiable because it gives you that infinite depth that makes it look like you are actually gazing into a nebula. If you use buttercream, it becomes a beautiful space-colored cake, but it won’t be a true galaxy cake.
What is the best way to cut a mirror glaze cake?
Cutting these cakes is where people often get nervous, thinking they’ll ruin all that beautiful hard work! The trick is utilizing heat and speed. Grab a very long, thin knife—the longer the better. Dip the blade completely into a pitcher of very hot water, then quickly wipe the knife totally dry with a towel. Make your cut straight down, using slow, steady pressure. Then, before the next cut, you repeat the hot water dip and dry ritual. It keeps the glaze from dragging or cracking as you slice through it cleanly.
Is this recipe suitable for a May the 4th baking project?
Oh, absolutely! This is practically *the* recipe for a truly epic May the 4th baking project. It captures the drama and scale of space opera way better than a standard sheet cake. If you’re celebrating Star Wars day, this transforms instantly into the most amazing star wars birthday cake you could imagine. It brings that grown-up, dramatic flair that’s so fun for a themed gathering. It’s over-the-top in the best possible way!
Understanding the Nutrition of Your Galaxy cake
Now, I know we are focused purely on making this stunning centerpiece, but sometimes folks ask me about the details, especially with all that sugar and chocolate in the glaze! Before we dive into the final share, let’s look at the numbers. Since this galaxy cake is incredibly rich, keep in mind that these figures are just solid estimates based on the standard ingredients and serving size of one slice. That richness means a little piece goes a long way!
Elena and I always stress that this is based on general ratios, not your specific base cake recipe, so take it as a general guide. But for reference, here’s the estimated breakdown for one slice:
- Serving Size: 1 slice
- Calories: 450
- Sugar: 55g
- Sodium: 150mg
- Fat: 22g
- Saturated Fat: 14g
- Trans Fat: 0g
- Carbohydrates: 60g
- Protein: 5g
See? It’s definitely a treat! This is why we pair it with simple things when serving—to balance out that decadence. It’s complex on the eyes and rich in flavor, making it perfect for your big celebration!
Share Your Artistic Baking Creations
Wow, we made it! You have tackled the tricky science of the mirror glaze and created your very own edible universe. I am so genuinely proud of you for diving into what feels like advanced pastry but is really just focused, careful cooking. Now, the most important part: seeing what you created!
Seriously, I want to see your cosmic masterpiece! Whether you used this as the ultimate star wars birthday cake or just wanted a dramatic dessert, snap a picture and share it with us. Tag us on social media—I love seeing how everyone chooses to swirl their colors to make their unique nebula patterns. It shows the true artistic exploration happening in your kitchens!
Also, please scroll down and leave a rating and a comment below. Tell me honestly how your first time with the glaze went. Did the temperature catch you out? Did you nail the swirling? Your feedback helps us keep refining these intense but wonderful recipes. If you need to get in touch with Elena directly for any detailed questions about process, you can reach out through our contact page here. Happy baking, you cosmic chefs!
PrintGalaxy Mirror Glaze Cake for May the 4th
Create a stunning, deep space effect on your cake using a vibrant mirror glaze technique. This recipe delivers an artistic, maximalist dessert perfect for your Star Wars birthday cake celebration.
- Prep Time: 45 min
- Cook Time: 10 min
- Total Time: 55 min
- Yield: 10 servings 1x
- Category: Dessert
- Method: Glazing
- Cuisine: American
- Diet: Vegetarian
Ingredients
- 1 standard 8-inch mirror glaze base cake (your favorite recipe)
- 1 cup white chocolate, finely chopped
- 2/3 cup sweetened condensed milk
- 1/2 cup granulated sugar
- 1/4 cup water
- 1/2 cup glucose syrup or light corn syrup
- 1 tablespoon powdered gelatin
- 1/4 cup cold water (for blooming gelatin)
- Gel food coloring (black, deep blue, purple, pink, white)
- Edible silver or gold glitter dust
Instructions
- Prepare your cake by ensuring it is completely frozen and placed on a wire rack set over a baking sheet to catch drips.
- Bloom the gelatin: Sprinkle 1 tablespoon of gelatin over 1/4 cup of cold water in a small bowl and let it sit for 5 minutes.
- Make the syrup: In a saucepan, combine the sugar and 1/4 cup of water. Heat until the sugar dissolves. Add the glucose syrup and bring the mixture to a boil without stirring. Remove from heat when it reaches 220 degrees Fahrenheit.
- Combine liquids: Pour the hot syrup over the chopped white chocolate and sweetened condensed milk in a heatproof bowl. Let it sit for 2 minutes, then stir until smooth.
- Melt gelatin: Gently warm the bloomed gelatin (do not boil) until it is fully liquid. Stir the liquid gelatin into the chocolate mixture until fully incorporated.
- Strain the glaze: Pour the mixture through a fine-mesh sieve into a clean measuring cup to remove any lumps.
- Color the glaze: Divide the glaze into several small bowls. Leave one portion black. Color the remaining portions with deep blue, purple, and pink. Keep the main black glaze in the largest bowl.
- Check temperature: Allow the glazes to cool to 90-95 degrees Fahrenheit. This temperature is crucial for a successful mirror glaze cake.
- Pour the glaze: Pour the black glaze over the frozen cake, covering the top and sides completely. Immediately drizzle small amounts of the blue, purple, and pink glazes randomly over the black base. Use a toothpick to gently swirl the colors together once or twice to create a nebula effect.
- Add stars: Before the glaze sets, lightly dust the surface with edible silver or gold glitter dust to mimic stars.
- Chill: Allow the glaze to set for 5 minutes. Carefully transfer the cake to a serving plate and chill for at least 2 hours before slicing.
Notes
- For the best marble effect, work quickly once you start pouring the colors onto the black base.
- If the glaze becomes too thick while working, gently reheat it in a warm water bath until it reaches the correct pouring temperature again.
- Use high-quality gel colors for the most intense, deep space hues.
Nutrition
- Serving Size: 1 slice
- Calories: 450
- Sugar: 55g
- Sodium: 150mg
- Fat: 22g
- Saturated Fat: 14g
- Unsaturated Fat: 8g
- Trans Fat: 0g
- Carbohydrates: 60g
- Fiber: 1g
- Protein: 5g
- Cholesterol: 40mg